Add New Web Framework Documents to the EHR
Add New Web Framework Documents to the EHR
Overview
When attempting to add new custom links and documents to the EHR one must first understand the basic overview of how pages are rendered in the EHR.
!! Be extremely careful when editing previously created and/or delivered Workplaces, Vertical Toolbars and Horizontal Toolbars as entire views can disappear if care is not taken. !!
The EHR is broken into 4 main components. Every user operates in a workspace that is designated to them. Within each of these workspaces there are multiple Vertical Toolbars (links along the left side of the EHR system going down). Each link of the Vertical Toolbar contains a Horizontal Toolbar (tabs going across at the top of each page). Each tab refers to a document, which is the space that your custom page will live in.

The key to successfully adding new pages to the EHR is to work from a bottom-up approach. Begin by creating a document, then create a Horizontal Toolbar and add the document created to it, then finally link this to your main page by creating a new Vertical Toolbar menu item and linking this to your Horizontal Toolbar.
Case Study
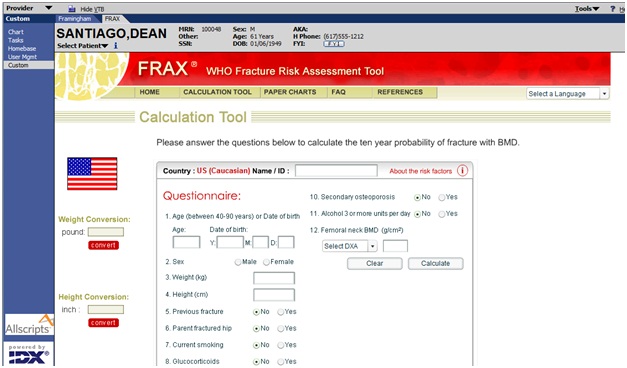
In the following example we will add a custom link on the VTB containing a Horizontal Toolbar with a tab named FRAX which point out to a website to help determine the likelihood for a patient to have a fracture (as pictured above). This will cause a website to be rendered in the viewing window as shown below.

Steps:
- Create a custom folder for the file to be saved in, for this example we have used the path C:\Program Files\Allscripts Healthcare Solutions\TouchWorks Web\Works\Custom.
- Create the file FRAX.htm file and save it in the above custom folder.
- Create the document:
- a. From the admin Workplace select documents.
- b. Select the new tab.
- c. Fill in the information as shown below for Product, Application and Type.
- d. Create an ID that is easily referenced when searching, in this case GHS for Galen Healthcare Services
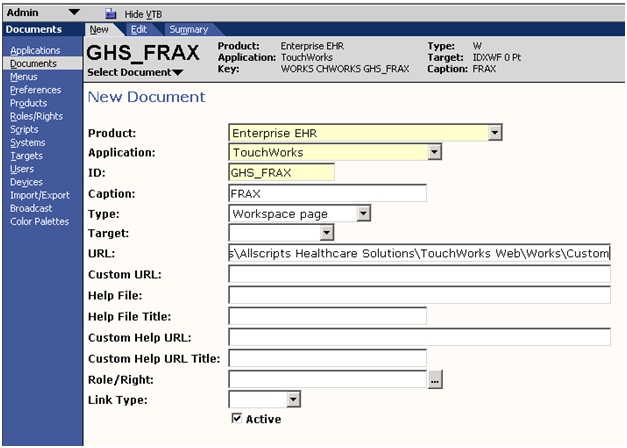
- e. Create a caption, this will be what the link will look like on the EHR.
- f. Specify the path in the URL where you saved the file.
- Create the Horizontal Tool Bar
- a. Navigate to Menus and select New
- b. Create a new Horizontal Toolbar as shown below for Product, Application and Type
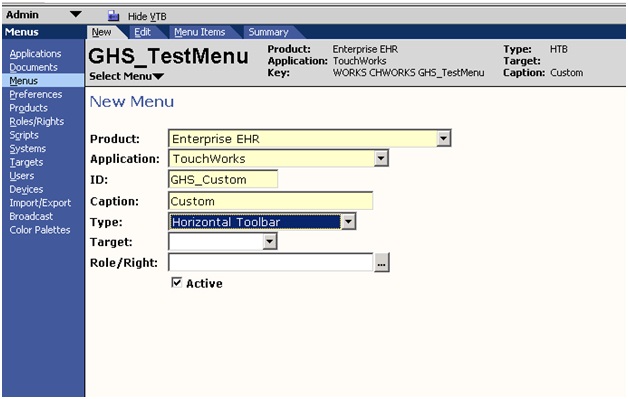
- c. Create an ID that is easily referenced when searching, in this case GHS for Galen Healthcare Services
- d. Create a caption, this will be what the link will look like on the EHR
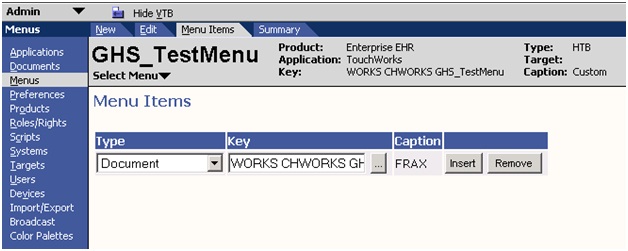
- Indicate that you would like to populate your menu and insert the FRAX document you just created as shown below
- Adding the Horizontal Toolbar to the Vertical Toolbar
- a. Search for the Vertical Toolbar that you first see when logging in as a user, in this case we are working in the Clinician Vertical Toolbar.
- b. Click on the Menu Items tab and insert a new HTB that points at the custom HTB that you created in the above step

- Log in as the user who’s VTB you added the new HTB to and verify that your changes were implemented successfully as shown below.