Difference between revisions of "Adding Images and Attachments to Wiki Articles"
Jump to navigation
Jump to search
| (12 intermediate revisions by 4 users not shown) | |||
| Line 1: | Line 1: | ||
| − | == Overview == | + | ==Overview== |
This is a how-to on creating Wiki articles with images/screenshots and attachments. | This is a how-to on creating Wiki articles with images/screenshots and attachments. | ||
| − | == Adding an Image to a Wiki Article== | + | ==Adding an Image to a Wiki Article== |
| + | *All images should be reduced by 75% before uploading, this makes articles easier to follow. Images can be reduced using Paint, Snaggit or most image editing applications. Additionally, it is possible to define the number of pixels for an image from within the wiki article after you upload the image as well - change the format of your image to: Image:filename.jpg|300px - you can define whatever you want the number of pixels to be. | ||
| − | * | + | *When capturing the image, select only the relevant context, do not use full screen images unless absolutely necessary. |
| − | * Be smart about using images. Consider which steps need images and which do not. Do not load an image for every step, this is a huge waste of time and just makes the article harder to follow. | + | *Be smart about using images. Consider which steps need images and which do not. Do not load an image for every step, this is a huge waste of time and just makes the article harder to follow. |
| − | * Try to use as few images as possible but include them where needed such as to show which icon to click, to indicate | + | *Try to use as few images as possible but include them where needed such as to show which icon to click, to indicate unlabeled items or other hard to describe or easy to confuse parts of the interface. |
| − | # Open your Wiki article - this may be a new Wiki article, or an update to an existing article. | + | #Open your Wiki article - this may be a new Wiki article, or an update to an existing article. |
| − | # Locate the area in your Wiki article where you'd like to have the image display. | + | #Locate the area in your Wiki article where you'd like to have the image display. |
| − | # Type in a unique name for your file in the following format | + | #Type in a unique name for your file in the following format: uniquename.jpg. |
| − | #* <u>If you use a filename that exists elsewhere on the wiki, that file or image will appear in your post '''''instead''''' of the file you want</u> | + | #*<u>If you use a filename that exists elsewhere on the wiki, that file or image will appear in your post '''''instead''''' of the file you want.</u><br>[[File:Example.jpg]] |
| + | #Highlight the filename/placeholder for your image and then click on the "Embedded image" button on the Wiki toolbar. | ||
#:[[Image:imagepost1.jpg]] | #:[[Image:imagepost1.jpg]] | ||
| − | + | #This is now your placeholder for your image. | |
| − | # This is now your placeholder for your image. | + | #When you have inserted all of your placeholders, click on Save page. |
| − | # When you have inserted all of your placeholders, click on Save page. | + | #Then after you have finished your article and save it all of the placeholders for images will appear in red, like a link with no info. |
| − | # Then after you have finished your article and save it all of the placeholders for images will | ||
#:[[Image:imagepost2.jpg]] | #:[[Image:imagepost2.jpg]] | ||
| − | # If you click on the image placeholder it will take you to the upload dialog box and you can select your image and upload. | + | #If you click on the image placeholder it will take you to the upload dialog box and you can select your image and upload. |
#:[[Image:imagepost3.jpg]] | #:[[Image:imagepost3.jpg]] | ||
| − | # Browse your computer for the .jpg file that you would like to add. Select it and click upload. | + | #Browse your computer for the .jpg file that you would like to add. Select it and click upload. |
| − | # Once uploaded, and you get your confirmation screen, you can scroll to the bottom of that page and you will see a link to navigate back to the page that you were just working on. Click on that link and then your next placeholder should be clickable to start all over. | + | #Once uploaded, and you get your confirmation screen, you can scroll to the bottom of that page and you will see a link to navigate back to the page that you were just working on. Click on that link and then your next placeholder should be clickable to start all over. |
#:[[Image:imagepost4.jpg]] | #:[[Image:imagepost4.jpg]] | ||
| − | == Attach a file to a Wiki Article == | + | ==Attach a file to a Wiki Article== |
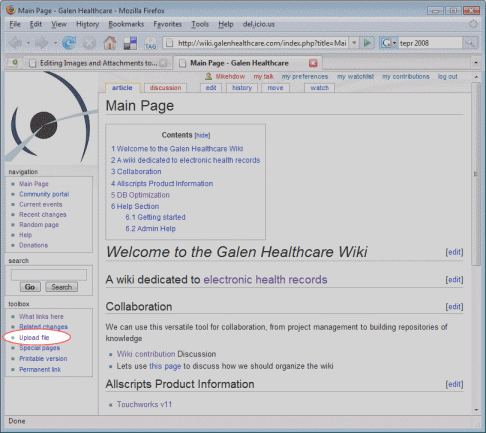
| − | # Click on the Upload File button in the toolbox on the bottom, left of the screen. | + | #Click on the Upload File button in the toolbox on the bottom, left of the screen. |
| − | #:[[Image:WikiAttachments_UploadFileButtonScreenshot.gif]] | + | #:[[Image:WikiAttachments_UploadFileButtonScreenshot.gif]] |
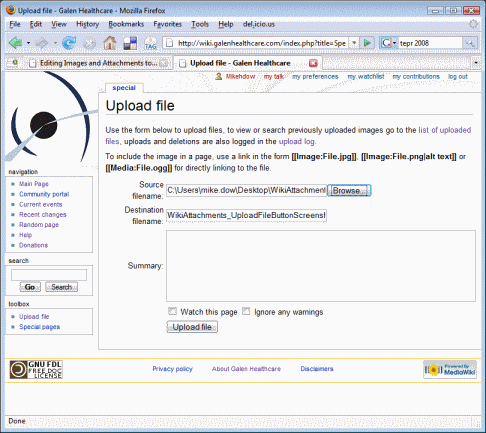
| − | # Browse to the file to be uploaded | + | #Browse to the file to be uploaded. |
| − | #:[[Image:WikiAttachments_UploadFileScreenshot.gif]] | + | #Check the box "Ignore Warnings." |
| − | # The following warning will appear. click on the Save File button | + | #Click the Upload button. |
| − | #:[[Image:WikiAttachments_UploadFileWarningScreenshot.gif]] | + | #:[[Image:WikiAttachments_UploadFileScreenshot.gif]] |
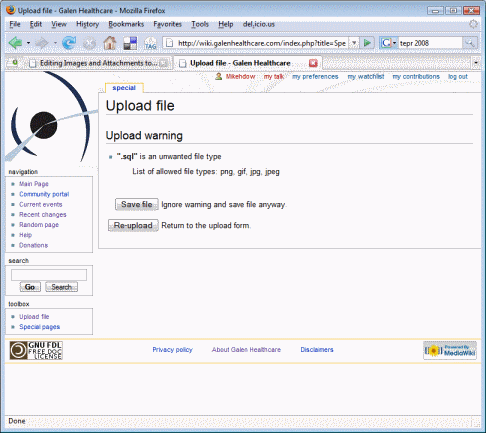
| − | # Immediately after uploading the file, a page will display with the details of the file. | + | #The following warning will appear. click on the Save File button. |
| − | # Right click on the file's name (where it shows up as a link). | + | #:[[Image:WikiAttachments_UploadFileWarningScreenshot.gif]] |
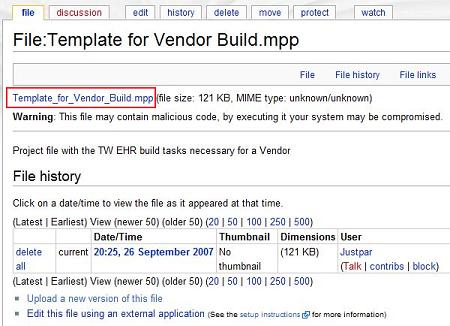
| − | #:[[File:Right click on File Name.JPG]] | + | #Immediately after uploading the file, a page will display with the details of the file. |
| − | # Click Properties | + | #Right click on the file's name (where it shows up as a link). |
| − | # Highlight the entire URL(e.g. <nowiki>http://wiki.galenhealthcare.com/images/2/29/Example_SQL_File.sql</nowiki>) | + | #:[[File:Right click on File Name.JPG]] |
| − | #:[[File:Copy the URL.JPG]] | + | #Click Properties. |
| − | #Right click and select Copy | + | #Highlight the entire URL(e.g., <nowiki>http://wiki.galenhealthcare.com/images/2/29/Example_SQL_File.sql</nowiki>). |
| − | # Open your Wiki article and locate the area in which you'd like the link to your file. Click on the External Link button. | + | #:[[File:Copy the URL.JPG]] |
| + | #Right click and select Copy. | ||
| + | #Open your Wiki article and locate the area in which you'd like the link to your file. Click on the External Link button. | ||
#:[[File:External Link Button.JPG]] | #:[[File:External Link Button.JPG]] | ||
| − | # It will add <nowiki>[http://www.example.com link title]</nowiki>. | + | #It will add <nowiki>[http://www.example.com link title]</nowiki>. Highlight <nowiki>http://www.example.com</nowiki> and replace it by pasting the URL of the uploaded file (you copied it into your clipboard in Step 8). |
| + | #Replace "link title" with the display name / description of the attachment. | ||
| − | == Upload a new version of an attached file== | + | ==Upload a new version of an attached file== |
| − | # Go to the article and click edit to see the actual name of the uploaded attachment | + | #Go to the article and click edit to see the actual name of the uploaded attachment. |
| − | # Open the Main page and click "Upload file" | + | #Open the Main page and click "Upload file." |
| − | # On the Upload file page click the link for "list of uploaded files" | + | #On the Upload file page click the link for "list of uploaded files." |
#:[[File:list of uploaded files.JPG]] | #:[[File:list of uploaded files.JPG]] | ||
| − | # Search for the file by name | + | #Search for the file by name. |
| − | # Click on the link to access the file's details page | + | #Click on the link to access the file's details page. |
| − | # Scroll down and Click "Upload a new version of this file" | + | #Scroll down and Click "Upload a new version of this file." |
Latest revision as of 20:47, 30 November 2012
Overview
This is a how-to on creating Wiki articles with images/screenshots and attachments.
Adding an Image to a Wiki Article
- All images should be reduced by 75% before uploading, this makes articles easier to follow. Images can be reduced using Paint, Snaggit or most image editing applications. Additionally, it is possible to define the number of pixels for an image from within the wiki article after you upload the image as well - change the format of your image to: Image:filename.jpg|300px - you can define whatever you want the number of pixels to be.
- When capturing the image, select only the relevant context, do not use full screen images unless absolutely necessary.
- Be smart about using images. Consider which steps need images and which do not. Do not load an image for every step, this is a huge waste of time and just makes the article harder to follow.
- Try to use as few images as possible but include them where needed such as to show which icon to click, to indicate unlabeled items or other hard to describe or easy to confuse parts of the interface.
- Open your Wiki article - this may be a new Wiki article, or an update to an existing article.
- Locate the area in your Wiki article where you'd like to have the image display.
- Type in a unique name for your file in the following format: uniquename.jpg.
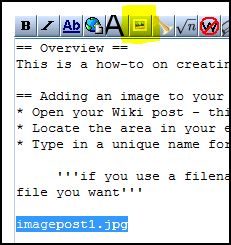
- Highlight the filename/placeholder for your image and then click on the "Embedded image" button on the Wiki toolbar.
- This is now your placeholder for your image.
- When you have inserted all of your placeholders, click on Save page.
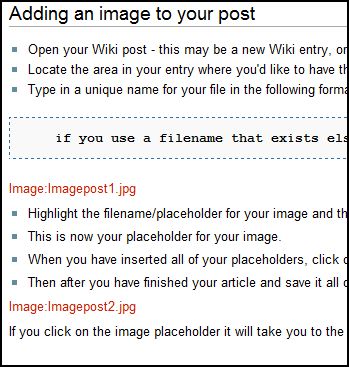
- Then after you have finished your article and save it all of the placeholders for images will appear in red, like a link with no info.
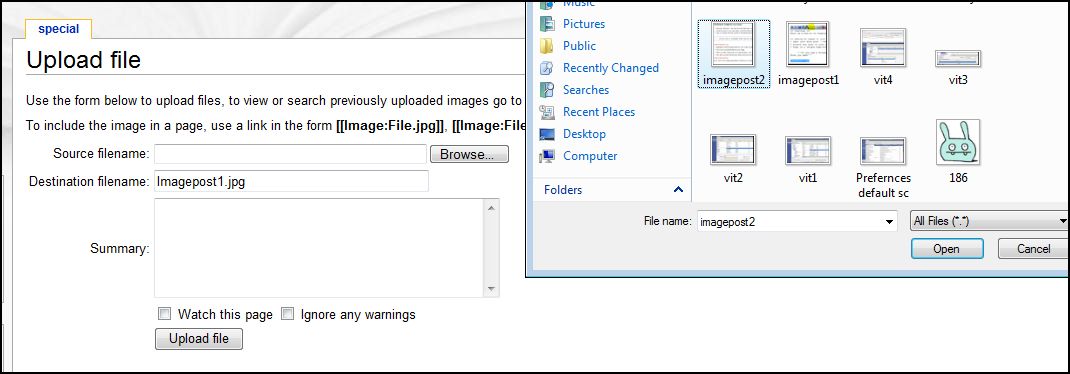
- If you click on the image placeholder it will take you to the upload dialog box and you can select your image and upload.
- Browse your computer for the .jpg file that you would like to add. Select it and click upload.
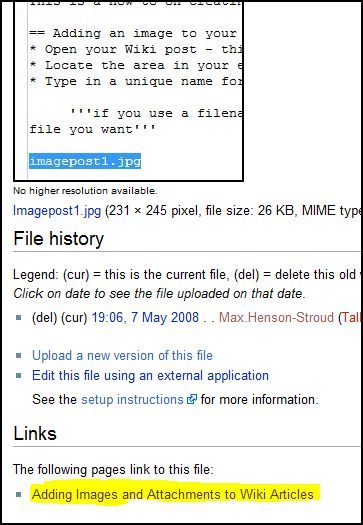
- Once uploaded, and you get your confirmation screen, you can scroll to the bottom of that page and you will see a link to navigate back to the page that you were just working on. Click on that link and then your next placeholder should be clickable to start all over.
Attach a file to a Wiki Article
- Click on the Upload File button in the toolbox on the bottom, left of the screen.
- Browse to the file to be uploaded.
- Check the box "Ignore Warnings."
- Click the Upload button.
- The following warning will appear. click on the Save File button.
- Immediately after uploading the file, a page will display with the details of the file.
- Right click on the file's name (where it shows up as a link).
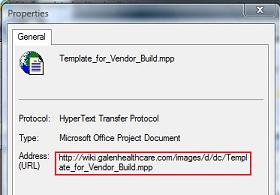
- Click Properties.
- Highlight the entire URL(e.g., http://wiki.galenhealthcare.com/images/2/29/Example_SQL_File.sql).
- Right click and select Copy.
- Open your Wiki article and locate the area in which you'd like the link to your file. Click on the External Link button.
- It will add [http://www.example.com link title]. Highlight http://www.example.com and replace it by pasting the URL of the uploaded file (you copied it into your clipboard in Step 8).
- Replace "link title" with the display name / description of the attachment.
Upload a new version of an attached file
- Go to the article and click edit to see the actual name of the uploaded attachment.
- Open the Main page and click "Upload file."
- On the Upload file page click the link for "list of uploaded files."
- Search for the file by name.
- Click on the link to access the file's details page.
- Scroll down and Click "Upload a new version of this file."

