Advanced Note Form Build
Description
This page is intended to provide a general understanding on the different tools available within the Touchworks Note Form Build workspace as well as tips and tricks that can be used throughout the note form build process.
Detail Forms
Due to the fact that a computer monitor can only display so much information, users are faced with the challenge of scrolling to find additional information within a noteform when everything cannot be displayed in a small area. If your users prefer to scroll, by all means build one parent form containing all the necessary information. For most users, this is not ideal however, because many times they don’t want to see all possible answers or be overloaded with options and information because they will not always be checking every box/finding for every patient on every note.
This is where detail forms come into play. Multiple detail forms can be linked to a parent form which are available to navigate to should a user desire the need to further qualify a concept with options that may not be present on the parent form. Findings on a detail form are usually those that are not most commonly used, but still available for use in those cases where the findings need to be documented. As a general rule, the parent form should contain all of the most commonly documented findings for a specific condition or visit type with the less common findings broken out into optional detail forms.
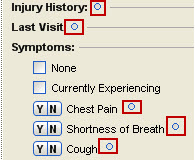
If there is a detail form available from the parent form, you will see a degree sign at the end of a finding/heading. If this degree sign is clicked, the user will be directed to the detail form that has been associated with the finding/heading.
Examples of degree signs available indicating detail forms are available:
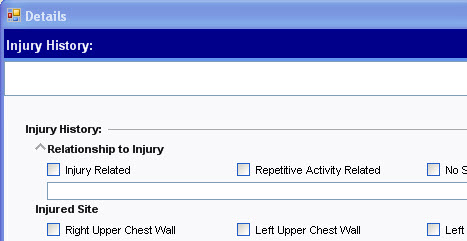
When a degree sign is clicked (i.e. Injury History), the user is directed to a detail form:
Hotspot Illustrations
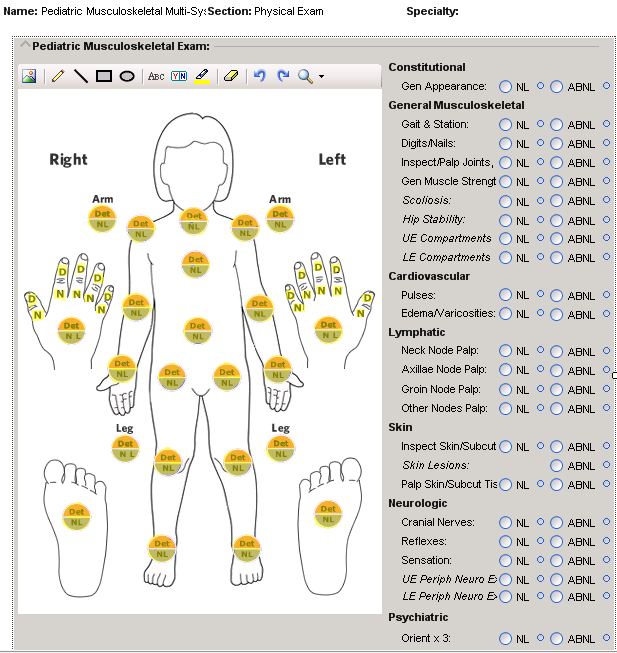
Hotspots are one way to utilize the detail or subform functionality by using an image or illustration to create “hotspot” links to the detail form. Hotspot based forms are most commonly used in the Physical Exam and Procedure note sections.
While hotspots can be useful, they may not be the best solution depending on the users you are creating the form(s) for. Remember to listen to your users before beginning the build process. Presenting different documentation options and seeing which are preferable will save you time and headache if it is built right from the beginning.
Example of an Allscripts-delivered Physical Exam form containing hotspot links to detail forms:
Complex sentences
Qualifiers
There are a bunch of properties within each finding that can be utilized to create complex sentences. For one, qualifiers are great ways to create long sentences made up of multiple variables withing have the break of a comma. Qualifiers can render on a parent form from findings linked to that heading or group within the parent form or even from subforms.
The available qualifier options are:
1. Prefix - renders the qualifier positive text at the beginning of the associated sentence.
2. Insert - renders the qualifier positive text where the ~M placeholder exists within the positive text of the associated sentence.
3. Suffix - renders the qualifier positive text at the end of the associated sentence.
4. None - this is the default setting.
Values & Units
VALUES: Inserts the value entered. This is commonly used to provide an additional text entry space to elaborate or specify further.
- ~V (tilde V) will display in the Positive Text and Negative Text properties as a placeholder for the text value that needs to be
entered. In addition, three underscores (“___”) are necessary in the Display Name property to render a line where the text value should be entered on the form.
UNITS: Inserts the unit of measure.
- ~U is placed after the ~V and before the desired units of measure in the Positive Text and/or Negative Text properties, like this:
~V[space]~Ucm. A space should be inserted between the ~V and the ~U to add a space between the text value and the units.
- ~V[space]~Ucm will yield “5 cm” whereas ~V~Ucm will yield “5cm”. If a value is entered in the text entry space, then the units will appear in the note text. If a value is not entered in the text, the unit of measure will not show in the rendered text.
Other Note Form Merge Fields
| Merge Value | Definition |
|---|---|
| ~M | Inserts qualifiers in the appropriate location |
| ~V | Inserts the value entered |
| ~U | Inserts the Unit of measure |
| ~Fn Ln~ | Inserts the Patient's first and last name |
| ~Fn~ | Inserts the Patient's first name |
| ~Mr/Ms Ln~ | Inserts the appropriate title for the Patient followed by their last name |
| ~Mr/Ms Fn Ln~ | Inserts the appropriate title for the Patient followed by their first name and last name |
| ~He/She~ | Inserts the appropriate gender term |
| ~His/Her~ | Inserts the appropriate gender term |
| ~male/female~ | Inserts the appropriate gender term |
| ~man/woman~ | Inserts the appropriate gender term |
| ~addr~ | Inserts the Patient’s address |
| ~mrn~ | Inserts the Patient’s medical record |
| ~dob~ | Inserts the Patient’s date of birth |
| ~age~ | Inserts the Patient’s age |
| ~Month d YYYY~ | Inserts the appropriate note creation date (office visit) in a month day, year format |
| ~mm/dd/yyyy~ | Inserts the appropriate note creation date (office visit) in a month/day/year format |
| ~HH:MM~ | Inserts the appropriate note creation time (hour: minute format) |
| ~~AM/PM~~ | Inserts the appropriate Am/Pm of the note creation (office visit) |
Exclusive/Inclusive Controls
It is very important to ascertain whether or not certain information in forms are going to be mutually exclusive or potentially inclusive. Unless you have a clinical background or know already from experience, it is important to ask the questions which will help you determine which tools to use during the build process.
Exclusive Controls
Mutually exclusive controls are grouped into radio groups, which present multiple options but ultimately will only allow one selection out of the group. This works great in situations where the information being documented will only ever be one selection within the group.
Inclusive Controls
If there needs to be multiple available selections that can potentially be selected within a concept, potentially inclusive controls should be utilized outside of the context of a radio group.
Examples of potentially inclusive controls include:
- Y/N
- Checkboxes
- Radio controls (built outside of radio groups)
- +/-
When to use Reverse Meaning
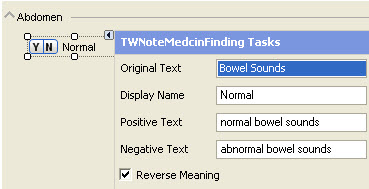
Reverse Meaning is an available property within most medcin/text controls. If you want to reverse a control's positive/negative render text, then this box should be checked. When selected, the control's original positive text will now be present in the negative text, and the control's original negative text will now be present in the positive text field.
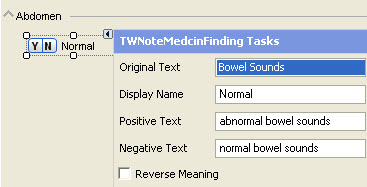
For example, here is a form where the desired display name of the control is "Normal":
In this case, we want the control's original negative text of "normal bowel sounds" to render when we select the positive (Y) value for this finding.
Without reverse meaning:
With reverse meaning:
This way, when the Y (positive text) value is selected, the rendering logic matches confirming that the abdomen is normal.
Additional Tips & Tricks
Recycling Document Types
It can be very beneficial when creating note templates to try and utilize existing document types. There are many reasons to do this, but mostly to decrease ongoing maintenance and push for some form of standardization. For example, you may have an Office Visit document type, and you can create multiple note templates for Office Visit, each assigned to a different specialty.
Elaborating on findings with no detail forms
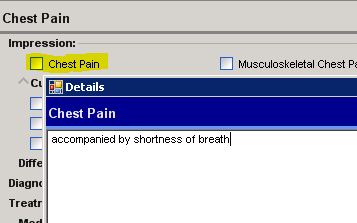
Double click on findings that have no detail forms to further qualify a concept. This will render the text you enter in the Detail box in parentheses after the render text of the finding itself.
Example of the detail window that appears when double clicking on a finding (chest pain):
The text entered in the detail box will display in parentheses at the end of the sentence of the render text:
Ongoing End User Education
Keep your end users educated beyond their initial training class! Provide ongoing training to keep them up to speed on what is possible within the documentation process. Doing so will help their workflow be more efficient as they continue to learn about all of the tools available to them as well as decrease the amount of ongoing support & maintenance needed.
