Difference between revisions of "Assign Security Classifications to users via TW or SSMT"
| (30 intermediate revisions by 6 users not shown) | |||
| Line 1: | Line 1: | ||
| − | This page was designed to show you how to assign Security Classifications to a user via [[ | + | This page was designed to show you how to assign Security Classifications to a user via [[Allscripts Enterprise EHR]] or SSMT. In this example, a new Security Classification GHS ROLE to 1 user (idamon) will be loaded via [[TouchWorks | TW]], as well as 5 users (adermott, ahsuser, bjones, ceisner and csnapp) via [[SSMT]]. |
== A good place to start == | == A good place to start == | ||
| − | A good place to start is in | + | A good place to start is in [[Allscripts Enterprise EHR]]. Assigning Security Classifications to a user will allow you to easily view the data you'll need when assigning the Security Classifications via SSMT. You'll see this when we extract the data. |
| − | For the purpose of this example | + | For the purpose of this example, "How to Create a New Security Classification" will also be reviewed. |
| − | + | Navigate to [[TWAdmin]] | |
| − | Select 'Sec Admin' in the VTB | + | Select 'Sec Admin' in the [[VTB]] |
Select 'Security' tab in the [[HTB]] | Select 'Security' tab in the [[HTB]] | ||
| Line 15: | Line 15: | ||
Choose 'Security Classification' from the 'Security Setup' Drop Down Menu | Choose 'Security Classification' from the 'Security Setup' Drop Down Menu | ||
| − | == | + | [[File:ssmt1.jpg]] |
| + | |||
| + | == Create a new Security Classification == | ||
Click Add (lower left) | Click Add (lower left) | ||
| Line 32: | Line 34: | ||
Click the 'Assign Codes' button. (Button in lower left of lower window, scroll down to view if not visible) | Click the 'Assign Codes' button. (Button in lower left of lower window, scroll down to view if not visible) | ||
| − | For example: To grant all security access except 'Chart-PrintChart' to this new classification called GHS ROLE | + | For example: To grant all security access (except 'Chart-PrintChart') to this new classification called GHS ROLE, simply move everything from "Available Codes" to "Current Selection", '''except''' for 'Chart-PrintChart' using the Down Arrow. |
[[Image:sc3.jpg]] | [[Image:sc3.jpg]] | ||
| Line 39: | Line 41: | ||
Click OK. | Click OK. | ||
| − | == | + | == Assign Security Classification to a User in Enterprise EHR == |
| − | #Highlight the classification | + | #Highlight the classification that will be assigned to the user |
# Click 'Assign Users' button | # Click 'Assign Users' button | ||
# Search for the user you want to assign | # Search for the user you want to assign | ||
| Line 52: | Line 54: | ||
Click OK | Click OK | ||
| − | + | The user will now be listed as one the of assigned users in the "Assign user" box. | |
[[Image:sc5.jpg]] | [[Image:sc5.jpg]] | ||
| Line 60: | Line 62: | ||
==Assign Security Classifications to Users via SSMT== | ==Assign Security Classifications to Users via SSMT== | ||
| − | In the above example a new security classification was created and assigned to a user via the | + | In the above example, a new security classification was created and assigned to a user via the 'Sec Admin' Workspace. |
The following example shows how to take a classification assigned to one user and assign it to others. | The following example shows how to take a classification assigned to one user and assign it to others. | ||
| − | '' | + | 1. Extract the 'User Security Classifications' data from [[Allscripts Enterprise EHR]] via [[SSMT]] |
| − | + | 2. Paste the extracted data into Excel | |
| − | + | 3. Search for the security classification you wish to assign under "Access Group Entry Name". In this example, 'GHS ROLE' will be used. If another user has the classification you wish to assign, you can search for that user. In this example, the security classification GHS ROLE has been assigned to "idamon". | |
| − | |||
| − | |||
| − | |||
| − | |||
| − | |||
| − | |||
| − | |||
| − | |||
| − | |||
| − | In this | ||
[[Image:sc0.jpg]] | [[Image:sc0.jpg]] | ||
| − | + | 4. Insert a new row for every user you want to add this Security Classification to. | |
| − | |||
| − | Insert a new row for every user you want to add this | ||
| − | |||
| − | |||
| − | |||
| − | |||
| − | |||
| − | |||
| + | 5. Copy the user's existing data into the newly inserted row and change the "Access Group Entry Code" and the "Access Group Entry Name" values to the new classification based on the already assigned user. In this example, change them to GHSrole and GHS ROLE. (see examples in bold below) | ||
[[Image:sc00.jpg]] | [[Image:sc00.jpg]] | ||
| − | + | 6. Load the data back into [[Allscripts Enterprise EHR]] via [[SSMT]] | |
| − | |||
| − | |||
| − | |||
| − | |||
| − | |||
| − | |||
| − | + | '''Verify data loaded properly''' | |
| − | Search for | + | # Login to [[Allscripts Enterprise EHR]] as [[TWAdmin]] |
| − | For this | + | # Click on TWUser Admin on the [[VTB]] |
| + | # Search for a user you added the Security Classification GHS ROLE to in SSMT. For this example I will use adermott. | ||
| + | #Verify GHS ROLE appears in the Security section for this user. | ||
[[Image:sc7.jpg]] | [[Image:sc7.jpg]] | ||
| − | + | ==Links== | |
| − | + | Back to [[Security]] | |
| − | |||
| − | |||
| − | [[ | ||
| − | |||
| − | |||
Latest revision as of 18:56, 5 April 2013
This page was designed to show you how to assign Security Classifications to a user via Allscripts Enterprise EHR or SSMT. In this example, a new Security Classification GHS ROLE to 1 user (idamon) will be loaded via TW, as well as 5 users (adermott, ahsuser, bjones, ceisner and csnapp) via SSMT.
A good place to start
A good place to start is in Allscripts Enterprise EHR. Assigning Security Classifications to a user will allow you to easily view the data you'll need when assigning the Security Classifications via SSMT. You'll see this when we extract the data.
For the purpose of this example, "How to Create a New Security Classification" will also be reviewed.
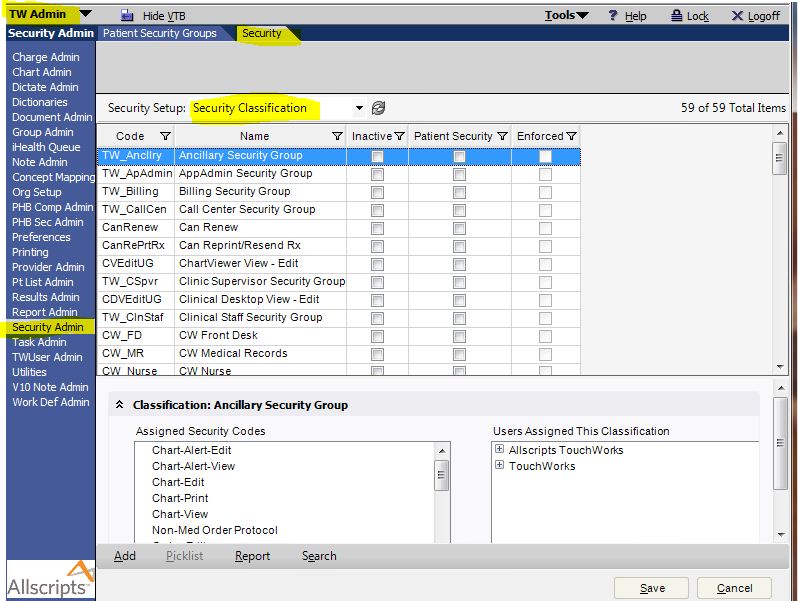
Navigate to TWAdmin
Select 'Sec Admin' in the VTB
Select 'Security' tab in the HTB
Choose 'Security Classification' from the 'Security Setup' Drop Down Menu
Create a new Security Classification
Click Add (lower left)
Enter GHS ROLE as the NAME Enter GHSrole as the CODE
(What do 'Inactive', Patient Security' and 'Enforced' do?)
Highlight GHS ROLE
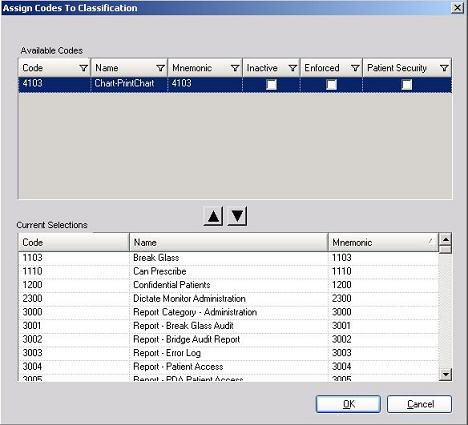
Click the 'Assign Codes' button. (Button in lower left of lower window, scroll down to view if not visible)
For example: To grant all security access (except 'Chart-PrintChart') to this new classification called GHS ROLE, simply move everything from "Available Codes" to "Current Selection", except for 'Chart-PrintChart' using the Down Arrow.
Click OK.
Assign Security Classification to a User in Enterprise EHR
- Highlight the classification that will be assigned to the user
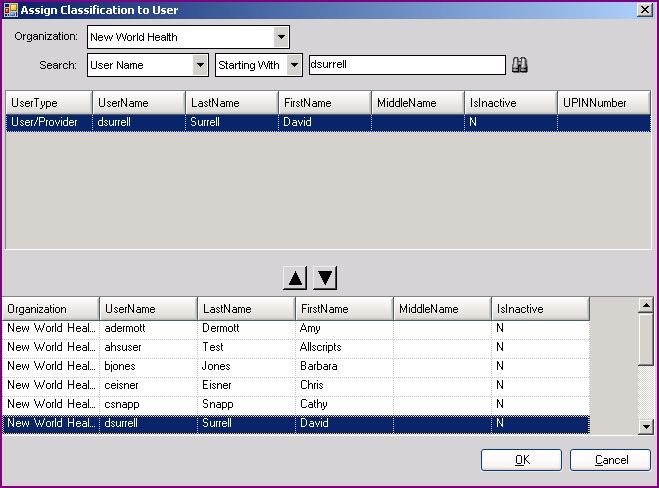
- Click 'Assign Users' button
- Search for the user you want to assign
- Highlight the user
- Move the user down to the bottom section using the "down Arrow"
Click OK
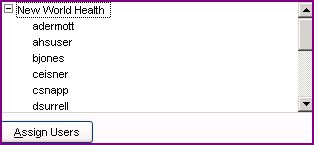
The user will now be listed as one the of assigned users in the "Assign user" box.
Click Save.
Assign Security Classifications to Users via SSMT
In the above example, a new security classification was created and assigned to a user via the 'Sec Admin' Workspace.
The following example shows how to take a classification assigned to one user and assign it to others.
1. Extract the 'User Security Classifications' data from Allscripts Enterprise EHR via SSMT
2. Paste the extracted data into Excel
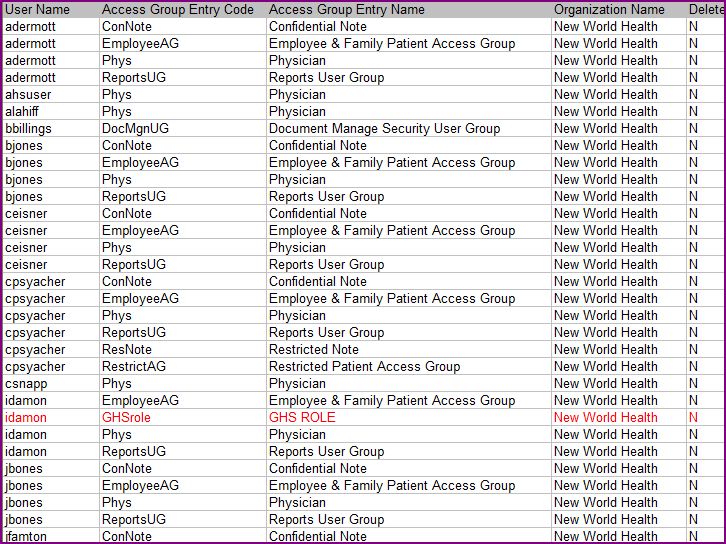
3. Search for the security classification you wish to assign under "Access Group Entry Name". In this example, 'GHS ROLE' will be used. If another user has the classification you wish to assign, you can search for that user. In this example, the security classification GHS ROLE has been assigned to "idamon".
4. Insert a new row for every user you want to add this Security Classification to.
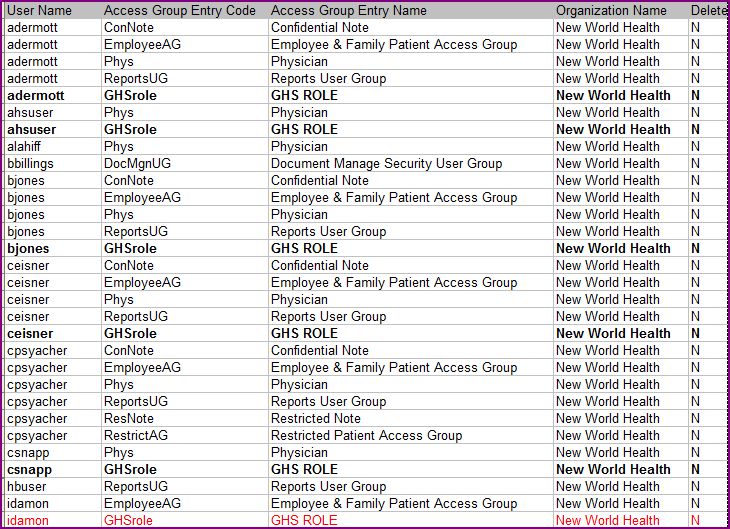
5. Copy the user's existing data into the newly inserted row and change the "Access Group Entry Code" and the "Access Group Entry Name" values to the new classification based on the already assigned user. In this example, change them to GHSrole and GHS ROLE. (see examples in bold below)
6. Load the data back into Allscripts Enterprise EHR via SSMT
Verify data loaded properly
- Login to Allscripts Enterprise EHR as TWAdmin
- Click on TWUser Admin on the VTB
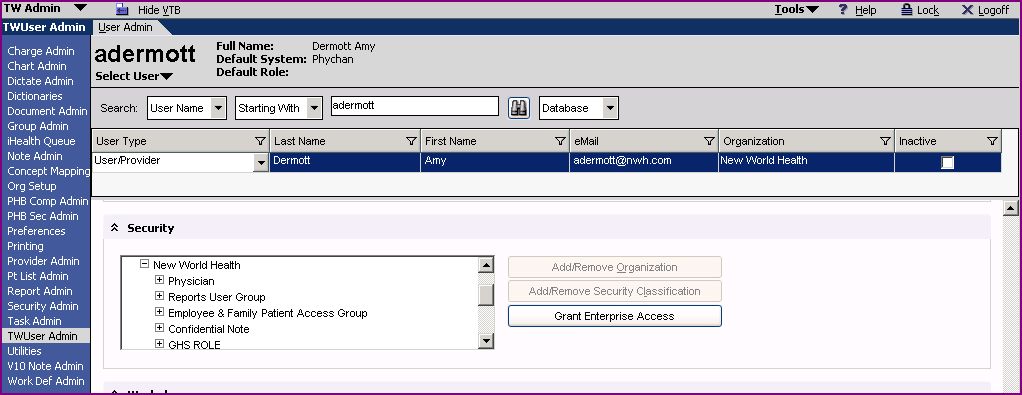
- Search for a user you added the Security Classification GHS ROLE to in SSMT. For this example I will use adermott.
- Verify GHS ROLE appears in the Security section for this user.
Links
Back to Security
