Difference between revisions of "Clinical Desktop Configuration"
Paula.Peter (talk | contribs) |
Paula.Peter (talk | contribs) |
||
| Line 25: | Line 25: | ||
Here you’ll see the default view, which in this example is the Adult Patient View utilizing View 3. You will also see the 8 Views you can pick from to create a new view. | Here you’ll see the default view, which in this example is the Adult Patient View utilizing View 3. You will also see the 8 Views you can pick from to create a new view. | ||
| − | [[Image: | + | [[Image:22A.jpg]] |
Revision as of 17:50, 1 May 2008
The Clinical Desktop View is a view of all of the patient information the clinician, physician or user needs to be able to care for a patient. The benefit of creating your own view is simple - you know what information you want to see, and how you want to see it displayed on your desktop. By setting up your own views, you can easily avoid excessive key clicks and time searching for the information you need to care for your patients.
Things to note before building your view(s) Clinical Desktop View Starter Sets - Allscripts provides a standard starter set of Clinical Desktop Views upon delivery of the Clinical Desktop in v11; users can use what’s provided or easily build their own view(s).
Security - Each TouchWorks user must have the “Workspace View Edit” security code assigned to them to be able to create or edit their “Clinical Desktop View”. This security clearance will activate the “edit” button in the Clinical Desktop.
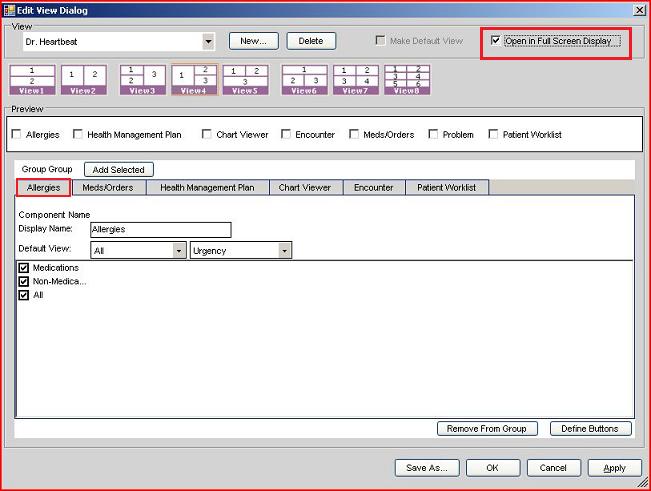
Full Screen Display– At any time you decide that you want to view one particular components information all by itself, simply check the box “Open in Full Screen Display”. This same check box may be if for any reason you do not like or wish to create a layered view, you can always use a “full screen display view” instead. No need to build layered views.
Let’s configure a Clinical Desktop View using View 4.
Log in to TouchWorks as an administrative user. Click “Work Def Admin” found on the vertical toolbar.
From the Workspace Definition Administrations workspace click Add/Edit Desktop View on the bottom left of workspace.
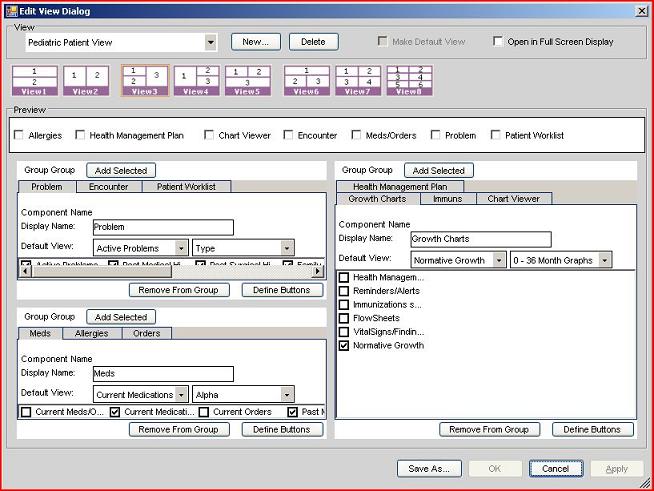
The Edit View Dialog window will appear.
Here you’ll see the default view, which in this example is the Adult Patient View utilizing View 3. You will also see the 8 Views you can pick from to create a new view.
Let’s create a new view named Dr. Heart Beat using View 4.
Click the “New…” button
The Create New View box will appear.
Type in a New View Name, it can be anything you’d like, but please keep in mind that your new view name will be seen by other users.
Click OK
Click on the View you’d like to create.
This example uses View 4, so when chosen, view 4 appears on my screen.
Next, decide which of these Components you want in each workspace.
Let’s say we want to view the following Components in the workspace on the left: Allergies, Meds/Orders and Problem. Check the boxes associated with Allergies, Meds/Orders and Problem Click the “Add Selected” button in the left side workspace
Now I’ll add Health Management Plan and Chart Viewer in the top right workspace and Encounter and Patient Worklist in the bottom right workspace.
Click Apply to save the view and stay on this page, or click OK to save view and return to the main page and Vertical Tool Bar.
This completes the basic design of my Clinical Desktop view.
Here is the Full Screen Display view; you can view each component s information separately by clicking on that components tab. For example: If you want to view the


