Difference between revisions of "Create Edit Task Views"
| (16 intermediate revisions by 9 users not shown) | |||
| Line 1: | Line 1: | ||
| + | [[Category:Tasking]] | ||
| + | __TOC__ | ||
==High Level Process for Upgrades== | ==High Level Process for Upgrades== | ||
There are several new Tasks in v11 | There are several new Tasks in v11 | ||
| − | # Review the new tasks that come delivered with v11 | + | # Review the new tasks that come delivered with v11. |
| − | #* Review default over due time settings and modify if desired | + | #* Review default over due time settings and modify if desired. |
| − | # Review current task views and add new tasks to the appropriate views | + | # Review current task views and add new tasks to the appropriate views. |
| − | # Determine if any new task views need to be created | + | # Determine if any new task views need to be created. |
| − | #* Create new teams for new views if needed | + | #* Create new teams for new views if needed. |
| − | #* Assign any new task views to the appropriate users | + | #* Assign any new task views to the appropriate users. |
==Recommendations== | ==Recommendations== | ||
| Line 16: | Line 18: | ||
==Review New V11 Tasks== | ==Review New V11 Tasks== | ||
| − | * A Microsoft Excel spreadsheet describing all tasks is available from the Allscripts Knowledge Base: | + | * A Microsoft Excel spreadsheet describing all tasks is available from the Allscripts Knowledge Base on Support Force: doc # 3350; this is aslo available on SupprotFroce or Client Connect under Product Documentation. |
| − | * The spreadsheet can be filtered or sorted by module to focus on only the modules the client has | + | * The spreadsheet can be filtered or sorted by module to focus on only the modules the client has. |
* The following link goes to a Wiki version sorted by Module: [[v11 Tasks]] | * The following link goes to a Wiki version sorted by Module: [[v11 Tasks]] | ||
| + | * See also [[11.x to 11.2 Incorporate new 11.2 Tasks]] | ||
==Edit Tasks== | ==Edit Tasks== | ||
| Line 27: | Line 30: | ||
The following settings can be modified: | The following settings can be modified: | ||
| − | '''Task Action''' | + | '''Task Action''' Grayed out in v11.1.7 |
| − | '''Delegate''' Check this box to prevent the task type from showing up in "My Active Tasks". | + | '''[[Delegated_Task | Delegate]]''' Check this box to prevent the task type from showing up in "My Active Tasks". |
| − | This is useful for tasks that are not going to be worked by a provider, but instead by a nurse or an MA. An example would be "Call in Failed Rx". | + | This is useful for tasks that are not going to be worked by a provider, but instead by a nurse or an MA. An example would be "Call in Failed Rx". It is important to remember to build a task view to capture these delegated tasks, or else they will not be seen by anyone. |
'''Default OverDue Time By priority''' | '''Default OverDue Time By priority''' | ||
| − | * Default time until task is flagged as overdue. A different time can set for each priority level. | + | * Default time until task is flagged as overdue. A different time can be set for each priority level. |
* In the example below, the task 'Call Back' will become overdue if not completed within '1 Day' (24 hours). If the user creating a 'Call Back' task selects the Priority 'ASAP' the task will become overdue in 6 hours. If 'Urgent', 60 minutes. | * In the example below, the task 'Call Back' will become overdue if not completed within '1 Day' (24 hours). If the user creating a 'Call Back' task selects the Priority 'ASAP' the task will become overdue in 6 hours. If 'Urgent', 60 minutes. | ||
| − | * The times are defaults and can be edited by the user when creating individual tasks | + | * The times are defaults and can be edited by the user when creating individual tasks. |
[[Image:Edit Task.jpg]] | [[Image:Edit Task.jpg]] | ||
| Line 69: | Line 72: | ||
* Complete the Task when Copy to Note - This option will automatically complete the task once it has been copied to note. | * Complete the Task when Copy to Note - This option will automatically complete the task once it has been copied to note. | ||
| − | * Default Encounter Type - Complete this option to select which encounter type the newly created note will attach to when "copy to note" is checked for a given task type | + | * Default Encounter Type - Complete this option to select which encounter type the newly created note will attach to when "copy to note" is checked for a given task type. |
| − | * Default Note Type - This option will automatically open a pre-determined note type when "copy to note" is checked for a given task type | + | * Default Note Type - This option will automatically open a pre-determined note type when "copy to note" is checked for a given task type. |
==Task Views Overview== | ==Task Views Overview== | ||
| Line 82: | Line 85: | ||
==Add Tasks to Views - Edit/Create Views== | ==Add Tasks to Views - Edit/Create Views== | ||
# 'TWAdmin' VTB > 'Task Admin' HTB > | # 'TWAdmin' VTB > 'Task Admin' HTB > | ||
| − | # Select 'Enterprise Views' or 'Personal Views' tab | + | # Select 'Enterprise Views' or 'Personal Views' tab. |
# The 'View:' field displays the name of the task view being created, edited or deleted. | # The 'View:' field displays the name of the task view being created, edited or deleted. | ||
# To edit or delete existing views, click 'Go' to see all existing views and select a view to edit. To find a specific view, type the ''beginning'' of the name into the 'View' field and click 'Go'. | # To edit or delete existing views, click 'Go' to see all existing views and select a view to edit. To find a specific view, type the ''beginning'' of the name into the 'View' field and click 'Go'. | ||
| − | # To create a new view, click 'New'. | + | # To create a new view, click 'New'. '''One should note that once the view is named and saved, the name cannot be changed.''' |
# Always enter a description of the view. | # Always enter a description of the view. | ||
[[Image:start.jpg]] | [[Image:start.jpg]] | ||
===Configure one or more filters to limit the tasks displayed=== | ===Configure one or more filters to limit the tasks displayed=== | ||
| − | Filters can be utilized to return smaller lists of tasks related to specific activities and roles. These filters are how the system will determine which specific tasks to show in a task view. For example, to isolate "Verify Result" tasks for a given provider, filter by "Assigned to", select the provider name, arrow over, then filter by the task type "verify results", arrow over then filter by task status of "active" and "in progress" to see all Verify Results tasks that are Active or In Progress for the referenced provider. By utilizing the filter function, larger task lists are broken down into smaller more manageable lists for the end user | + | Filters can be utilized to return smaller lists of tasks related to specific activities and roles. These filters are how the system will determine which specific tasks to show in a task view. For example, to isolate "Verify Result" tasks for a given provider, filter by "Assigned to", select the provider name, arrow over, then filter by the task type "verify results", arrow over, then filter by task status of "active" and "in progress" to see all Verify Results tasks that are Active or In Progress for the referenced provider. By utilizing the filter function, larger task lists are broken down into smaller more manageable lists for the end user. |
| − | #Use the left and right buttons to add or remove | + | #Use the left and right buttons to add or remove filter selections from the view. |
| − | #Multiple values can be selected for the same filter | + | #Multiple values can be selected for the same filter. |
#:[[Image:multiple values.jpg]] | #:[[Image:multiple values.jpg]] | ||
'''Filters:''' | '''Filters:''' | ||
| − | *'''Assigned To''' displays only tasks assigned to the user or users selected | + | *'''Assigned To''' displays only tasks assigned to the user or users selected. |
| − | **The Team option will return tasks assigned to a particular team | + | **The Team option will return tasks assigned to a particular team. |
| − | **The team list is at the enterprise level and for large organizations can become long and difficult to navigate through when assigning tasks. For this situation, a false user can be created in place of a team. This allows users to select from user favorites instead of searching through the entire list of teams. | + | **The team list is at the enterprise level and for large organizations can become long and difficult to navigate through when assigning tasks. For this situation, a false user can be created in place of a team. This allows users to select from user favorites instead of searching through the entire list of teams. See [[#Create Teams as Users|Create Teams as Users]] below. |
*'''Created''' displays only tasks created on a certain day or range of days. | *'''Created''' displays only tasks created on a certain day or range of days. | ||
| Line 106: | Line 109: | ||
*'''Created By''' displays only tasks created by the user or users selected. | *'''Created By''' displays only tasks created by the user or users selected. | ||
| − | *'''Delegated''' displays only delegated tasks. Example: The view Cardiology Billing might be Created By = [select cardiology providers], Delegated = Y, Task = Adjust Charges (as long as this task type has the "delegated" box checked | + | *'''Delegated''' displays only delegated tasks. Example: The view Cardiology Billing might be Created By = [select cardiology providers], Delegated = Y, Task = Adjust Charges (as long as this task type has the "delegated" box checked). All "Adjust Charges" tasks for the providers selected will show up in the view. |
*'''Overdue''' displays only overdue tasks. | *'''Overdue''' displays only overdue tasks. | ||
| − | *'''Patient''' displays only tasks related to the patient in context or to an alphabetical range of patients | + | *'''Patient''' displays only tasks related to the patient in context or to an alphabetical range of patients. |
*'''Priority''' displays only tasks with the selected priority or priorities. | *'''Priority''' displays only tasks with the selected priority or priorities. | ||
| Line 124: | Line 127: | ||
==Assign Views to Users== | ==Assign Views to Users== | ||
| − | This can be done manually or through SSMT. When assigning a large amount of views SSMT is the preferred method. | + | This can be done manually or through SSMT. When assigning a large amount of views, SSMT is the preferred method. |
===Manual=== | ===Manual=== | ||
| − | Assign view to 1 user and workflow test before assigning to multiple users | + | Assign view to 1 user and workflow test before assigning to multiple users. |
| − | # Select 'Manage Personal' tab | + | # Select 'Manage Personal' tab. |
| − | # Select a user from the 'Views For:' dropdown or click 'All' to search all users. | + | # Select a user from the 'Views For:' dropdown or click 'All' to search all users. |
#:[[Image:select user.jpg]] | #:[[Image:select user.jpg]] | ||
| − | # To | + | # To add enterprise task views to the user, select the view in the lower table and click 'Add to My Views'. |
| − | # To | + | # To remove views from a user, select the view in the upper table and click "Remove". |
#* If the selected view is a personal view, the system will display a warning before deleting the view. | #* If the selected view is a personal view, the system will display a warning before deleting the view. | ||
# Select the default view for the user by selecting a view from the upper table and clicking 'Set as Default'. | # Select the default view for the user by selecting a view from the upper table and clicking 'Set as Default'. | ||
#* The view selected as default cannot be removed. To remove the default view, make another view the default. | #* The view selected as default cannot be removed. To remove the default view, make another view the default. | ||
#:[[Image:taskg.jpg]] | #:[[Image:taskg.jpg]] | ||
| + | #**Note: To quickly scroll through the list of task views, hover over the "more" button while holding the Page Down key and click as it scrolls down. Or, you can also click Alt + M. | ||
===SSMT=== | ===SSMT=== | ||
| − | Task views can be assigned to multiple users using SSMT Category: 'Task View-Users' | + | Task views can be assigned to multiple users using SSMT Category: 'Task View-Users'. |
| − | *'*HDRAUsername' is the user | + | *'*HDRAUsername' is the user. |
| − | *'Name' is the task view | + | *'Name' is the task view. |
| − | *'Task Owner' is | + | *'Task Owner' is the task view creator. |
| − | *'IsDefault' must be Y or N. Only one row per user can be Y | + | *'IsDefault' must be Y or N. Only one row per user can be Y. |
| − | *'Create (Y N)' must be set to Y for added rows | + | *'Create (Y N)' must be set to Y for added rows. |
| − | To copy task views from one user to another | + | To copy task views from one user to another: |
| − | #Sort the exported list by '*HDRAUsername' | + | #Sort the exported list by '*HDRAUsername'. |
#Identify a user who already has the task view or views to be assigned to the new user. This will usually be a user with the same role. | #Identify a user who already has the task view or views to be assigned to the new user. This will usually be a user with the same role. | ||
| − | #Copy the rows for the views to be assigned | + | #Copy the rows for the views to be assigned. |
| − | #Do not copy rows for views already assigned to the new user | + | #Do not copy rows for views already assigned to the new user. |
| − | #Add the copied rows to the spreadsheet | + | #Add the copied rows to the spreadsheet. |
| − | #Change '*HDRAUsername' to the new username | + | #Change '*HDRAUsername' to the new username. |
| − | #If 'Task Owner' = username, change it to the new user name | + | #If 'Task Owner' = username, change it to the new user name. |
| − | #Change 'Create (Y N)' to Y only for the rows that were added | + | #Change 'Create (Y N)' to Y only for the rows that were added. |
For SSMT basics see [[SSMT]] | For SSMT basics see [[SSMT]] | ||
| Line 161: | Line 165: | ||
The advantage to this approach has to do with the way the drop down lists work on the New Task page. The team drop down shows all entries in the Team dictionary. The user drop down is a favorites list and only shows the values that have been searched for by that user. If you have the same set of teams at each site, it’ll turn into quite a long list of teams and be very difficult to select. The only time we suggest using teams is for central teams that are used system wide. Other than that it’s much better to use the user concept and define a naming convention that is consistent and easy to train users on how to search for their specific teams. | The advantage to this approach has to do with the way the drop down lists work on the New Task page. The team drop down shows all entries in the Team dictionary. The user drop down is a favorites list and only shows the values that have been searched for by that user. If you have the same set of teams at each site, it’ll turn into quite a long list of teams and be very difficult to select. The only time we suggest using teams is for central teams that are used system wide. Other than that it’s much better to use the user concept and define a naming convention that is consistent and easy to train users on how to search for their specific teams. | ||
| + | |||
| + | Another advantage of creating teams as users instead of teams is that when you are creating the task views you can not add 'teams' and 'users' to the same view. When you try to add a 'team' it will replace the 'users' and the same goes if you try to add the 'users' to a 'team' view. Likely it would be more accommodating to be able to add the team (that was created as a user) to a the end-users default view and not have toggle between views to see team views and user views. | ||
===High Level Process=== | ===High Level Process=== | ||
| Line 176: | Line 182: | ||
# First Name: Front Desk | # First Name: Front Desk | ||
# Email: email@email.com | # Email: email@email.com | ||
| − | # Organization: Select the Organization the | + | # Organization: Select the Organization the "False User" will belong to |
# User Name: NWHDermatologyFrontDesk (no spaces) | # User Name: NWHDermatologyFrontDesk (no spaces) | ||
| − | # Default Site: Select the Site the | + | # Default Site: Select the Site the "False User" will belong to |
# Password: password | # Password: password | ||
# Profession: Other | # Profession: Other | ||
Latest revision as of 16:06, 17 July 2014
High Level Process for Upgrades
There are several new Tasks in v11
- Review the new tasks that come delivered with v11.
- Review default over due time settings and modify if desired.
- Review current task views and add new tasks to the appropriate views.
- Determine if any new task views need to be created.
- Create new teams for new views if needed.
- Assign any new task views to the appropriate users.
Recommendations
- The team list is at the enterprise level and for large organizations can become long and difficult to navigate through when assigning tasks. For this situation, a false user can be created in place of a team. This allows users to select from user favorites instead of searching through the entire list of teams. see Create Teams as Users below
- Create a task view for 'All tasks created by me today' Useful for finding misplaced tasks
- Notify training team of work around for Authorize Order Tasks not in Patient Worklist
- Create a task view for all 'Clinical Future Tasks'. This is useful when a clinical user (e.g. MA or RN) terminates and the user account is inactivated, yet the user still has inactive future tasks that will need to be worked by someone upon activation of the future tasks.
- Create a 'Lab Order Feedback' task view for organizations who have a two-way lab interface. This view is useful for communicating necessary lab order changes between clinical and IT/IS staff when lab results are stuck in the interface.
Review New V11 Tasks
- A Microsoft Excel spreadsheet describing all tasks is available from the Allscripts Knowledge Base on Support Force: doc # 3350; this is aslo available on SupprotFroce or Client Connect under Product Documentation.
- The spreadsheet can be filtered or sorted by module to focus on only the modules the client has.
- The following link goes to a Wiki version sorted by Module: v11 Tasks
- See also 11.x to 11.2 Incorporate new 11.2 Tasks
Edit Tasks
Tasks come delivered with preset overdue limits and other settings and most should not need modification.
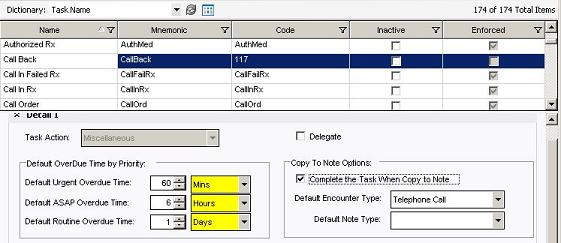
Dictionaries > Task Name dictionary
The following settings can be modified:
Task Action Grayed out in v11.1.7
Delegate Check this box to prevent the task type from showing up in "My Active Tasks". This is useful for tasks that are not going to be worked by a provider, but instead by a nurse or an MA. An example would be "Call in Failed Rx". It is important to remember to build a task view to capture these delegated tasks, or else they will not be seen by anyone.
Default OverDue Time By priority
- Default time until task is flagged as overdue. A different time can be set for each priority level.
- In the example below, the task 'Call Back' will become overdue if not completed within '1 Day' (24 hours). If the user creating a 'Call Back' task selects the Priority 'ASAP' the task will become overdue in 6 hours. If 'Urgent', 60 minutes.
- The times are defaults and can be edited by the user when creating individual tasks.
Copy To Note Options
Available for the following Tasks:
| Task Action | Task Name |
| Miscellaneous | Call Back |
| Miscellaneous | Follow Up |
| Miscellaneous | Health Maintenance Alert |
| Miscellaneous | Hospital Calls |
| Process Note | Medical Problem or Complaint |
| Miscellaneous | Medication Renewal |
| Miscellaneous | Patient Arrived |
| Miscellaneous | Personal |
| Process Note | Referral Follow Up |
| Process Result | Result Follow Up |
- Complete the Task when Copy to Note - This option will automatically complete the task once it has been copied to note.
- Default Encounter Type - Complete this option to select which encounter type the newly created note will attach to when "copy to note" is checked for a given task type.
- Default Note Type - This option will automatically open a pre-determined note type when "copy to note" is checked for a given task type.
Task Views Overview
- Enterprise task views can be created and assigned to multiple users.
- One or more personal views can be created for each individual user.
- A user can access their personal and/or assigned enterprise views via dropdown.
- One of these views must be designated as the default display.
- Enterprise views and default views should be created and assigned based on roles.
- Personal views should be used only to accommodate a user's personal preferences.
Add Tasks to Views - Edit/Create Views
- 'TWAdmin' VTB > 'Task Admin' HTB >
- Select 'Enterprise Views' or 'Personal Views' tab.
- The 'View:' field displays the name of the task view being created, edited or deleted.
- To edit or delete existing views, click 'Go' to see all existing views and select a view to edit. To find a specific view, type the beginning of the name into the 'View' field and click 'Go'.
- To create a new view, click 'New'. One should note that once the view is named and saved, the name cannot be changed.
- Always enter a description of the view.
Configure one or more filters to limit the tasks displayed
Filters can be utilized to return smaller lists of tasks related to specific activities and roles. These filters are how the system will determine which specific tasks to show in a task view. For example, to isolate "Verify Result" tasks for a given provider, filter by "Assigned to", select the provider name, arrow over, then filter by the task type "verify results", arrow over, then filter by task status of "active" and "in progress" to see all Verify Results tasks that are Active or In Progress for the referenced provider. By utilizing the filter function, larger task lists are broken down into smaller more manageable lists for the end user.
- Use the left and right buttons to add or remove filter selections from the view.
- Multiple values can be selected for the same filter.
Filters:
- Assigned To displays only tasks assigned to the user or users selected.
- The Team option will return tasks assigned to a particular team.
- The team list is at the enterprise level and for large organizations can become long and difficult to navigate through when assigning tasks. For this situation, a false user can be created in place of a team. This allows users to select from user favorites instead of searching through the entire list of teams. See Create Teams as Users below.
- Created displays only tasks created on a certain day or range of days.
- Created By displays only tasks created by the user or users selected.
- Delegated displays only delegated tasks. Example: The view Cardiology Billing might be Created By = [select cardiology providers], Delegated = Y, Task = Adjust Charges (as long as this task type has the "delegated" box checked). All "Adjust Charges" tasks for the providers selected will show up in the view.
- Overdue displays only overdue tasks.
- Patient displays only tasks related to the patient in context or to an alphabetical range of patients.
- Priority displays only tasks with the selected priority or priorities.
- Status displays only tasks with the selected status or statuses.
When filtering for tasks with status "Active", "In Progress" must also be selected because "In Progress" tasks are active tasks that are currently being worked.
- Task displays only the task types selected.
Configure one or more sorts to organize the tasks displayed
Note: Sorts will be executed in order.
Assign Views to Users
This can be done manually or through SSMT. When assigning a large amount of views, SSMT is the preferred method.
Manual
Assign view to 1 user and workflow test before assigning to multiple users.
- Select 'Manage Personal' tab.
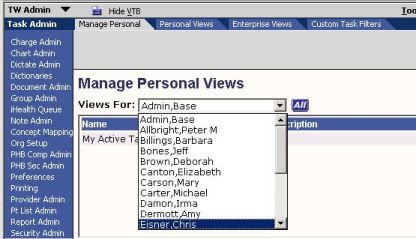
- Select a user from the 'Views For:' dropdown or click 'All' to search all users.
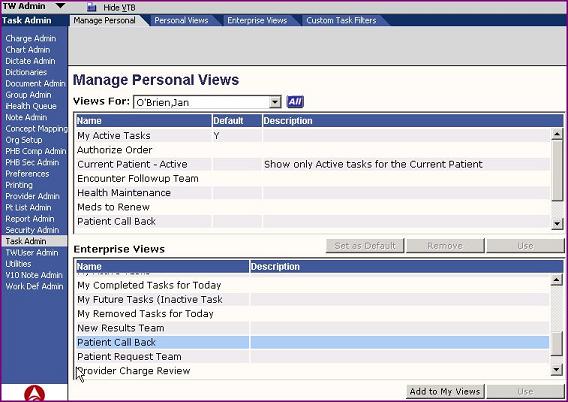
- To add enterprise task views to the user, select the view in the lower table and click 'Add to My Views'.
- To remove views from a user, select the view in the upper table and click "Remove".
- If the selected view is a personal view, the system will display a warning before deleting the view.
- Select the default view for the user by selecting a view from the upper table and clicking 'Set as Default'.
- The view selected as default cannot be removed. To remove the default view, make another view the default.
- Note: To quickly scroll through the list of task views, hover over the "more" button while holding the Page Down key and click as it scrolls down. Or, you can also click Alt + M.
SSMT
Task views can be assigned to multiple users using SSMT Category: 'Task View-Users'.
- '*HDRAUsername' is the user.
- 'Name' is the task view.
- 'Task Owner' is the task view creator.
- 'IsDefault' must be Y or N. Only one row per user can be Y.
- 'Create (Y N)' must be set to Y for added rows.
To copy task views from one user to another:
- Sort the exported list by '*HDRAUsername'.
- Identify a user who already has the task view or views to be assigned to the new user. This will usually be a user with the same role.
- Copy the rows for the views to be assigned.
- Do not copy rows for views already assigned to the new user.
- Add the copied rows to the spreadsheet.
- Change '*HDRAUsername' to the new username.
- If 'Task Owner' = username, change it to the new user name.
- Change 'Create (Y N)' to Y only for the rows that were added.
For SSMT basics see SSMT
Create Teams as Users
The team list is at the enterprise level and for large organizations can become long and difficult to navigate through when assigning tasks. For this situation, a false user can be created in place of a team. This allows users to select from user favorites instead of searching through the entire list of teams.
The advantage to this approach has to do with the way the drop down lists work on the New Task page. The team drop down shows all entries in the Team dictionary. The user drop down is a favorites list and only shows the values that have been searched for by that user. If you have the same set of teams at each site, it’ll turn into quite a long list of teams and be very difficult to select. The only time we suggest using teams is for central teams that are used system wide. Other than that it’s much better to use the user concept and define a naming convention that is consistent and easy to train users on how to search for their specific teams.
Another advantage of creating teams as users instead of teams is that when you are creating the task views you can not add 'teams' and 'users' to the same view. When you try to add a 'team' it will replace the 'users' and the same goes if you try to add the 'users' to a 'team' view. Likely it would be more accommodating to be able to add the team (that was created as a user) to a the end-users default view and not have toggle between views to see team views and user views.
High Level Process
Example: New World Health has a dermatology practice with three front desk staff.
- Create false user 'NWH Dermatology,Front Desk'
- Create task view 'Dermatology Front Desk'. Set filter 'Assigned To' to 'NWH Dermatology,Front Desk'
- Assign task view 'Dermatology Front Desk' to the three front desk staff
- Add user 'NWH Dermatology,Front Desk' to the list of favorite users for all users that will assign tasks to the dermatology front desk.
Detailed Steps
Create False User
- VTB: TWUser Admin > HTB User Admin
- User Type: User
- Last Name: NWH Dermatology
- First Name: Front Desk
- Email: email@email.com
- Organization: Select the Organization the "False User" will belong to
- User Name: NWHDermatologyFrontDesk (no spaces)
- Default Site: Select the Site the "False User" will belong to
- Password: password
- Profession: Other
- Save
Create Task View
- VTB: Task Admin > HTB Enterprise Views
- Click 'New'.
- View: Dermatology Front Desk
- Description: All tasks assigned to the false user 'NWH Dermatology,Front Desk'
- Assigned To: User: NWH Dermatology,Front Desk
- Status: Active, In Progress
- Save
Assign View to Team
Assign view: 'Dermatology Front Desk' to the three front desk staff
(Copy and edit Assign Views to Users to make specific to Creating Teams as Users and specific to this example)
Add False User to Favorites
Add the user 'NWH Dermatology,Front Desk' to the list of favorite users for all users that will assign tasks to the dermatology front desk
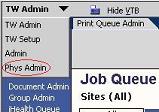
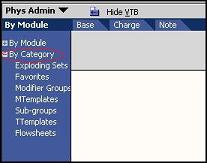
- Navigate to the Physician Admin Menu by using the drop-down in the top right hand corner of the screen
- Expand the “By Category” Menu
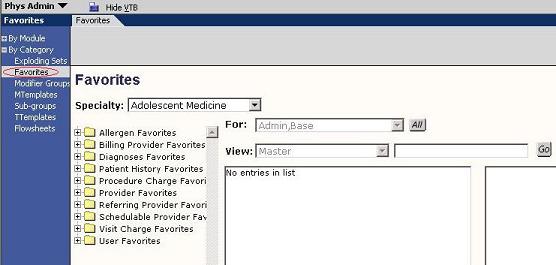
- Select Favorites
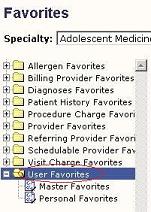
- Expand 'User Favorites'. This is the list of people users choose from when assigning tasks
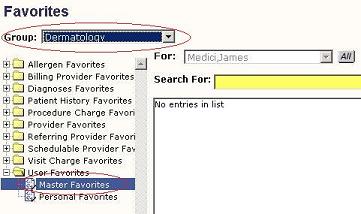
- Select 'Master Favorites' if all members of a specialty (Dermatology) will need to assign tasks to the 'NWH Dermatology,Front Desk' team
- Select Group: Dermatology (Specialties must be mapped to Groups?)
- Select 'Personal Favorites' if only some users will need to assign tasks to the 'NWH Dermatology,Front Desk' team
- Select a user who will need to assign tasks from the 'For:' dropdown (Group should be grayed out when personal is selected?)
- Add the user 'NWH Dermatology,Front Desk' to 'User Favorites' list for the selected user
- Search for the user 'NWH Dermatology,Front Desk'
- Click on the user 'NWH Dermatology,Front Desk' in the left pane to add it to the user favorites in the right pane
- Save
- Saved Successfully will appear for a second in the upper right hand corner of your screen
Test
- Login as a user who needs to assign tasks to the dermatology front desk team
- Create a new task and assign it to NWH Dermatology,Front Desk
- Login as a member of the dermatology front desk team, navigate to tasks and select view 'Dermatology Front Desk'
- The task should be present
