Difference between revisions of "Creating Patient Location and Patient Status information"
Paula.Peter (talk | contribs) |
Jerri.cowper (talk | contribs) |
||
| (154 intermediate revisions by 6 users not shown) | |||
| Line 1: | Line 1: | ||
| − | == | + | ==Overview== |
| + | The '''Patient Site Location''' field allows a user to select, track and communicate the physical location for a patient | ||
| + | * Examples of Patient Locations are: Waiting Room, Check In, Exam Room 1, Lab | ||
| + | * Organizations can name the patient locations however they wish, but should attempt to find a cohesive naming convention across the organization (such as Exam Room 1, Exam Room 2). This may require input from clinical staff in order to define logical, appropriate names. | ||
| + | * We recommend to collect the data similar to how the data is extracted when using SSMT. The format should be room name and number in column A and the sites to follow. Below is the suggested format. | ||
| − | |||
| − | + | [[File:patient location 1.jpg]] | |
| − | |||
| − | + | * If you wish to utilize this format this excel document is organized in this manner to make collecting the data easiest. | |
| − | + | [[http://wiki.galenhealthcare.com/images/f/f5/Gathering_Room_Number_and_Location_Spread_Sheet.xls Gathering Room Number and Location SpreadSheet]] | |
| + | * Organizations must assign their locations to Sites so that each Site sees only locations at that site. If a location is not assigned to a site it will not appear in the dropdown | ||
| + | * The Pt Loc is assigned to the PATIENT in context. It is not specific to the encounter, date or site. If the Pt Loc is set at one site, another site will see this Location value even if it is not assigned to that site. However, the dropdown values will only consist of the Locations assigned to that site. | ||
| + | * Pt Locations are designed to be cleared out by a nightly process. | ||
| + | **'''Preferences name''': Patient Site Location | ||
| + | **'''UI name''': Pat Loc | ||
| + | **'''Dictionary name''': Site Location (not Patient Location) | ||
| + | **'''SSMT category''': Site Location (not Patient Location) | ||
| − | |||
| + | The '''Patient Encounter Status''' field identifies the various statuses of a patient office visit. | ||
| + | * Examples of Status are: Arrived, No Show, Cancelled, Bumped, Departed | ||
| + | * Organizations can name the patient locations however they wish and create as many as they need, but they cannot make inactive the status 'Departed' because it is used by the system | ||
| + | * Organizations must assign their statuses to Sites. A Status can be assigned to all sites, some sites or one site. If a status is not assigned to a site it will not appear in the dropdown | ||
| + | **'''Preferences name''': Patient Encounter Status | ||
| + | **'''UI name''': Status | ||
| + | **'''Dictionary name''': Encounter Status | ||
| + | **'''SSMT category''': Encounter Status | ||
| − | |||
| − | + | [[Image:introa.jpg]] | |
| − | + | ==High Level Process for New or Upgrade== | |
| + | Locations, Statuses, and Sites can be collected prior test upgrade | ||
| + | #Extract Site, Site Location and Encounter Status categories from SSMT | ||
| + | #Paste Site Location and Encounter Status into BW | ||
| + | #Client populates both tables | ||
| + | #Load into test environment | ||
| + | #Client validates in test | ||
| + | #Load from test into live | ||
| − | + | == Create Entries for Patient Location or Status - SSMT== | |
| + | '''Note''': Entries can be edited or made inactive but cannot be removed from the dictionary. Have your Location, Status and Site information organized and validated before proceeding. Review the existing entries and decide if there are any you want to overwrite or make temporarily inactive. | ||
| − | + | # Using SSMT extract the Site Location dictionary remembering to have Show Headers in Extracted Data checked. Such as the image below: | |
| + | [[File:site1.jpg]] | ||
| − | |||
| − | + | * When formating Site Location to excel your spread sheet should look like this: | |
| + | [[File:site2.jpg]] | ||
| + | * You may Extract SSMT category 'Site' to refer to when entering the site location data. This spread sheet will have all your site information (address, entry code, entry name, etc.). When formated to excel this spread sheet formatted to excel should look like this: | ||
| − | + | [[File:site3.jpg]] | |
| − | + | *'''!''' Do not select the 'Patient Location' category. This is used by the registration & scheduling interface to track inpatient location | |
| + | *'Site Location' and 'Encounter Status' categories were added to SSMT later and are not in alphabetical order. They are near the bottom. | ||
| + | # To eliminate an existing entry replace the existing values with one of your new entries. If you have no new entry to replace it with, set 'Inactive' to 'Y' | ||
| + | # Enter Code: must be unique, 10 characters or less, start with Org mnemonic, example 'NWH_Rm1' or 'NWH_Arr' | ||
| + | # Enter Name: as it should appear in dropdown | ||
| + | # Enter Mnemonic: match CODE exactly | ||
| + | # Enter Sequence: number the locations in the order you'd like them to appear in the patient location drop-down in the clinical toolbar. | ||
| + | # Enter SITE CODE: Must match entry in SITE dictionary exactly | ||
| + | # Enter SITE NAME: Must match entry in SITE dictionary exactly | ||
| + | #*Example: New World Health has 2 sites North and South. Both sites have rooms 1-3. The Site Location table would need 6 entries, rooms 1-3 with site code and name for South and rooms 1-3 with site code and name for North. | ||
| + | # Set 'Create New' value to Y for all entries to be created | ||
| + | # If there are delivered or existing entries that need to be made temporarily inactive, set 'Inactive' to 'Y' | ||
| + | * When finalized and ready for upload your excel spread sheet should look like this: | ||
| − | + | [[File:site4.jpg]] | |
| − | |||
| − | + | #'''Do Not Load''' until you are certain of all your entries, spelling etc… Once loaded, entries can be edited or made inactive but cannot be removed from the dictionary. | |
| − | + | == Create Entries for Patient Location or Status - Manual== | |
| + | <!--Why does it say to click on TWSetup OR TWAdmin? Aren't "dictionaries" only under TWAdmin?--> | ||
| + | '''Note''': Entries can be edited or made inactive but cannot be removed from the dictionary. Have your Location, Status and Site information organized and validated before proceeding. Review the existing entries and decide if there are any you want to overwrite or make temporarily inactive. | ||
| − | [[Image: | + | #Log in to TouchWorks as a user with access to the TW Setup or TWAdmin VTB |
| + | #Click on '''TW Setup''' or '''TWAdmin''' > '''Dictionaries''' | ||
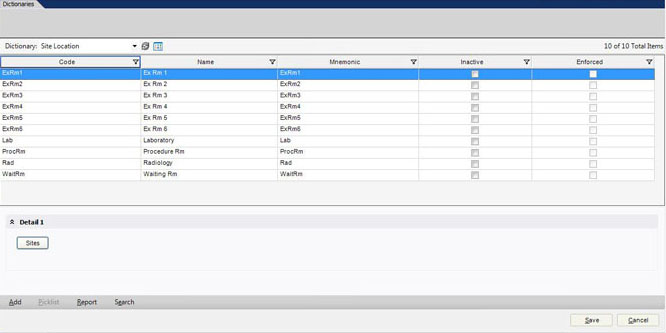
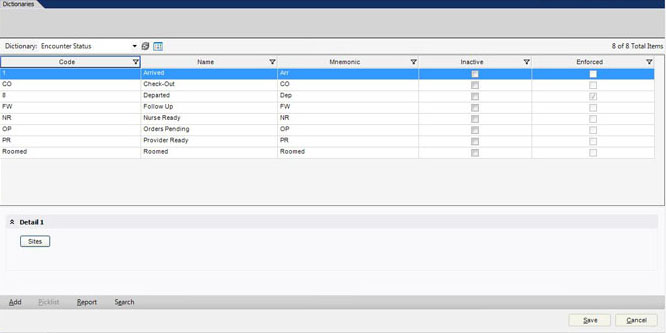
| + | #Click on the Dictionary drop down Menu and chose '''SITE LOCATION''' to work with the 'Pat Loc' drop down or '''ENCOUNTER STATUS''' to work with the 'Status' drop down. | ||
| + | #*'''!''' Do not select the 'Patient Location' dictionary. This is used by the registration & scheduling interface to track inpatient location | ||
| + | #:[[Image:Site Location.jpg]] | ||
| + | #:or | ||
| + | #:[[Image:Encounter_Status.jpg]] | ||
| + | #:[[Image:Enter.jpg|right]] | ||
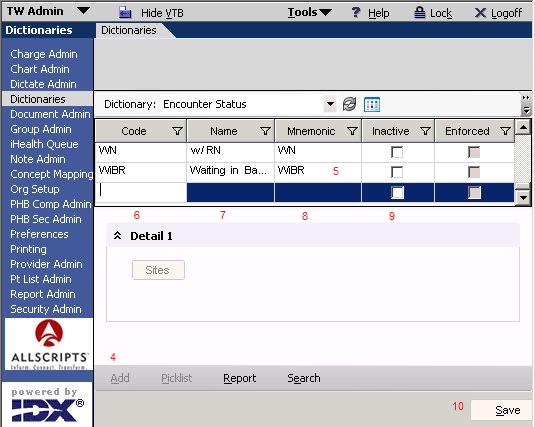
| + | #Click '''ADD''' and a new line will be created for you to add your entry. | ||
| + | # To eliminate an existing entry replace the existing values with one of your new entries. If you have no new entry to replace it with, check the inactive box. | ||
| + | # Enter Code: must be unique, 10 characters or less, start with Org mnemonic, example 'NWH_Rm1' or 'NWH_Arr' | ||
| + | # Enter Name: as it should appear in dropdown | ||
| + | # Enter Mnemonic: match CODE exactly | ||
| + | # If there are delivered or existing entries that need to be made temporarily inactive, Check 'Inactive' | ||
| + | #* The Status 'Departed' cannot be made inactive. It is used by the system | ||
| + | #'''Do Not SAVE''' until you are certain of all your entries, spelling etc… Once you hit SAVE, entries can be edited or made inactive but cannot be removed from the dictionary. | ||
| + | == Assign Location or Status Entries to Site(s)== | ||
| + | ===Example=== | ||
| + | *If New World Health has 3 Sites and the Site Location 'Playroom' is located at the Children's Clinic Site, Assign Site Location 'Playroom' to the Children's Clinic Site only. | ||
| + | [[Image:Assign_Site_Example_tag.jpg]] | ||
| + | *If the entry I added applied to more than one Site, I would assign the newly loaded entry to those sites as well | ||
| + | *Only entries assigned to the same site as the user will be available in their drop down menu | ||
| + | *Even if an organization only has one site, all the entries still need to be assigned to that site | ||
| + | *An entry not assigned to any sites will not be visible in the dropdown | ||
| − | + | ===Steps=== | |
| + | #In the Site Location or Encounter Status Dictionary, highlight an entry | ||
| + | #Click the 'Sites' button to assign the entry to a site or sites | ||
| + | #Highlight a site in the Available Sites pane | ||
| + | #Click 'Add' to move it over to the ASSIGNED SITE pane | ||
| + | #Click 'Remove' to remove assigned sites from the entry | ||
| + | #Click OK | ||
| + | [[Image:Assign_Site.jpg]] | ||
| − | Click ''' | + | == Set Preferences == |
| + | <!--Why does it say to log in to "TWSetup" when the you should log in to "TWAdmin"?Change?--> | ||
| + | # Log in to TouchWorks as a user with access to the TW Setup VTB | ||
| + | # Click on '''TW Setup''' > '''Preferences''' | ||
| + | # Set 'Patient Tracking – Use Patient Site Location' to Y | ||
| + | # Set 'Patient Tracking – Use Patient Encounter Status' to Y | ||
| + | # When preferences are set to N, Pat Loc: and/or Status: are grayed out in the user interface | ||
| + | [[Image:Patient_Tracking_Preferences.jpg]] | ||
| − | + | == Validate In UI == | |
| + | <!--The Encounter Status is grayed out when I log in as a provider, even though both are set to Y??--> | ||
| + | #Log in as a user | ||
| + | #A patient must be in context to see Pat Loc and Status values | ||
| + | #The Pat Loc and Status values should be '''visible''' in Schedule/Daily and Provider Schedules | ||
| + | #The Pat Loc and Status values should be '''editable''' in the Clinical Toolbar and the Encounter Summary | ||
| + | #''All the entries assigned to the user's Site'' should be visible in the dropdowns | ||
| + | == Removing Entries from the drop down menus == | ||
| + | There are '''three ways''' to remove an entry from the dropdown menu. See the sections above for detailed steps. | ||
| + | #Replace it with a new entry, by editing the 'Code', 'Name' and 'Mnemonic' in the dictionary | ||
| + | #*see Create Entries for Patient Location or Status - SSMT | ||
| + | #*see Create Entries for Patient Location or Status - Manual | ||
| + | #Make it inactive for all Sites by checking the 'Inactive' box or setting 'Inactive' to Y in SSMT | ||
| + | #:(The entry can be reativated at any time by unchecking the box or removing the Y) | ||
| + | #*see Create Entries for Patient Location or Status - SSMT | ||
| + | #*see Create Entries for Patient Location or Status - Manual | ||
| + | #Remove it from a Site | ||
| + | #*see Assign Location or Status Entries to Site(s) | ||
| + | == Correcting Order of Patient Rooms in Patient Location Picklist == | ||
| − | + | * When creating patient locations within the V11 upgrade it is best to find a cohesive naming convention (i.e. Exam Room 1, Exam Room 2). However, the V11 system does not interpret the numbers by their numeric equivalence and rather as their numeric sequence (i.e. V11 does not read Exam Room 10 as the number 10, but rather as Exam Room 1-0 and thus will place Exam Room 10 following Exam Room 1 within your patient location picklist). | |
| − | + | *If you are using a naming convention within a site that has more than 9 rooms (I.e. Patient Room 1-15) this issue is likely to occur and will appear like this: | |
| − | |||
| − | |||
| − | + | [[File:picklist6.jpg]] | |
| − | |||
| − | |||
| − | |||
| − | + | *For accuracy and ease of V11 use, you will want to edit this so that your picklist is in numeric pattern for your users. As seen below: | |
| − | |||
| − | + | [[File:picklist1.jpg]] | |
| − | + | * After completing your patient location configuration, log into your system as a user and check if your patient location picklist is in the correct sequential order. If it is not you will need to do the following: | |
| − | + | 1. Extract Site Location from SSMT, remembering to have ‘Show Headers in Extracted Data’ checked. | |
| + | 2. Format the extraction into excel. Your spread sheet will appear like this if you have a naming convention with more than 9 rooms and your picklist is not in the correct sequential order. | ||
| − | + | [[File:picklist2.jpg]] | |
| − | |||
| − | |||
| − | |||
| − | + | 3. Organize the rooms into the order you wish for them to appear in your patient location picklist. Like So: | |
| − | |||
| − | + | [[File:picklist3.jpg]] | |
| − | + | 4. Notice the numbers within the Sequence Column are all “0”. The next step is to order the rooms by number within the Sequence column as you want them to appear in the picklist. | |
| − | + | [[File:picklist4.jpg]] | |
| − | |||
| − | + | 5. After replacing the zeros with the appropriate order number your excel spread sheet should now look like this: | |
| − | |||
| − | + | [[File:picklist5.jpg]] | |
| − | |||
| − | |||
| − | + | 6. The last step is to copy your excel spread sheet (without the column headers) and paste it back into SSMT. | |
| + | 7. Press Load Data. | ||
| + | 8. You still need to completely log out of V11 and log back in as a user to check if your data loaded appropriately. If your picklist is in the correct numeric order then you are all set and can mark this as completed in your Build Work Book. | ||
| − | + | Return to [[V10 to V11.2 Build Workbook (BW)]] | |
| − | |||
| − | |||
| − | |||
| − | |||
| − | |||
| − | |||
| − | |||
| − | |||
| − | |||
| − | |||
| − | |||
| − | |||
| − | |||
| − | |||
| − | |||
| − | |||
| − | [[ | ||
Latest revision as of 23:16, 14 March 2011
Overview
The Patient Site Location field allows a user to select, track and communicate the physical location for a patient
- Examples of Patient Locations are: Waiting Room, Check In, Exam Room 1, Lab
- Organizations can name the patient locations however they wish, but should attempt to find a cohesive naming convention across the organization (such as Exam Room 1, Exam Room 2). This may require input from clinical staff in order to define logical, appropriate names.
- We recommend to collect the data similar to how the data is extracted when using SSMT. The format should be room name and number in column A and the sites to follow. Below is the suggested format.

- If you wish to utilize this format this excel document is organized in this manner to make collecting the data easiest.
[Gathering Room Number and Location SpreadSheet]
- Organizations must assign their locations to Sites so that each Site sees only locations at that site. If a location is not assigned to a site it will not appear in the dropdown
- The Pt Loc is assigned to the PATIENT in context. It is not specific to the encounter, date or site. If the Pt Loc is set at one site, another site will see this Location value even if it is not assigned to that site. However, the dropdown values will only consist of the Locations assigned to that site.
- Pt Locations are designed to be cleared out by a nightly process.
- Preferences name: Patient Site Location
- UI name: Pat Loc
- Dictionary name: Site Location (not Patient Location)
- SSMT category: Site Location (not Patient Location)
The Patient Encounter Status field identifies the various statuses of a patient office visit.
- Examples of Status are: Arrived, No Show, Cancelled, Bumped, Departed
- Organizations can name the patient locations however they wish and create as many as they need, but they cannot make inactive the status 'Departed' because it is used by the system
- Organizations must assign their statuses to Sites. A Status can be assigned to all sites, some sites or one site. If a status is not assigned to a site it will not appear in the dropdown
- Preferences name: Patient Encounter Status
- UI name: Status
- Dictionary name: Encounter Status
- SSMT category: Encounter Status

High Level Process for New or Upgrade
Locations, Statuses, and Sites can be collected prior test upgrade
- Extract Site, Site Location and Encounter Status categories from SSMT
- Paste Site Location and Encounter Status into BW
- Client populates both tables
- Load into test environment
- Client validates in test
- Load from test into live
Create Entries for Patient Location or Status - SSMT
Note: Entries can be edited or made inactive but cannot be removed from the dictionary. Have your Location, Status and Site information organized and validated before proceeding. Review the existing entries and decide if there are any you want to overwrite or make temporarily inactive.
- Using SSMT extract the Site Location dictionary remembering to have Show Headers in Extracted Data checked. Such as the image below:

- When formating Site Location to excel your spread sheet should look like this:

- You may Extract SSMT category 'Site' to refer to when entering the site location data. This spread sheet will have all your site information (address, entry code, entry name, etc.). When formated to excel this spread sheet formatted to excel should look like this:

- ! Do not select the 'Patient Location' category. This is used by the registration & scheduling interface to track inpatient location
- 'Site Location' and 'Encounter Status' categories were added to SSMT later and are not in alphabetical order. They are near the bottom.
- To eliminate an existing entry replace the existing values with one of your new entries. If you have no new entry to replace it with, set 'Inactive' to 'Y'
- Enter Code: must be unique, 10 characters or less, start with Org mnemonic, example 'NWH_Rm1' or 'NWH_Arr'
- Enter Name: as it should appear in dropdown
- Enter Mnemonic: match CODE exactly
- Enter Sequence: number the locations in the order you'd like them to appear in the patient location drop-down in the clinical toolbar.
- Enter SITE CODE: Must match entry in SITE dictionary exactly
- Enter SITE NAME: Must match entry in SITE dictionary exactly
- Example: New World Health has 2 sites North and South. Both sites have rooms 1-3. The Site Location table would need 6 entries, rooms 1-3 with site code and name for South and rooms 1-3 with site code and name for North.
- Set 'Create New' value to Y for all entries to be created
- If there are delivered or existing entries that need to be made temporarily inactive, set 'Inactive' to 'Y'
- When finalized and ready for upload your excel spread sheet should look like this:

- Do Not Load until you are certain of all your entries, spelling etc… Once loaded, entries can be edited or made inactive but cannot be removed from the dictionary.
Create Entries for Patient Location or Status - Manual
Note: Entries can be edited or made inactive but cannot be removed from the dictionary. Have your Location, Status and Site information organized and validated before proceeding. Review the existing entries and decide if there are any you want to overwrite or make temporarily inactive.
- Log in to TouchWorks as a user with access to the TW Setup or TWAdmin VTB
- Click on TW Setup or TWAdmin > Dictionaries
- Click on the Dictionary drop down Menu and chose SITE LOCATION to work with the 'Pat Loc' drop down or ENCOUNTER STATUS to work with the 'Status' drop down.
- ! Do not select the 'Patient Location' dictionary. This is used by the registration & scheduling interface to track inpatient location
- or
- Click ADD and a new line will be created for you to add your entry.
- To eliminate an existing entry replace the existing values with one of your new entries. If you have no new entry to replace it with, check the inactive box.
- Enter Code: must be unique, 10 characters or less, start with Org mnemonic, example 'NWH_Rm1' or 'NWH_Arr'
- Enter Name: as it should appear in dropdown
- Enter Mnemonic: match CODE exactly
- If there are delivered or existing entries that need to be made temporarily inactive, Check 'Inactive'
- The Status 'Departed' cannot be made inactive. It is used by the system
- Do Not SAVE until you are certain of all your entries, spelling etc… Once you hit SAVE, entries can be edited or made inactive but cannot be removed from the dictionary.


Assign Location or Status Entries to Site(s)
Example
- If New World Health has 3 Sites and the Site Location 'Playroom' is located at the Children's Clinic Site, Assign Site Location 'Playroom' to the Children's Clinic Site only.

- If the entry I added applied to more than one Site, I would assign the newly loaded entry to those sites as well
- Only entries assigned to the same site as the user will be available in their drop down menu
- Even if an organization only has one site, all the entries still need to be assigned to that site
- An entry not assigned to any sites will not be visible in the dropdown
Steps
- In the Site Location or Encounter Status Dictionary, highlight an entry
- Click the 'Sites' button to assign the entry to a site or sites
- Highlight a site in the Available Sites pane
- Click 'Add' to move it over to the ASSIGNED SITE pane
- Click 'Remove' to remove assigned sites from the entry
- Click OK

Set Preferences
- Log in to TouchWorks as a user with access to the TW Setup VTB
- Click on TW Setup > Preferences
- Set 'Patient Tracking – Use Patient Site Location' to Y
- Set 'Patient Tracking – Use Patient Encounter Status' to Y
- When preferences are set to N, Pat Loc: and/or Status: are grayed out in the user interface
![]()
Validate In UI
- Log in as a user
- A patient must be in context to see Pat Loc and Status values
- The Pat Loc and Status values should be visible in Schedule/Daily and Provider Schedules
- The Pat Loc and Status values should be editable in the Clinical Toolbar and the Encounter Summary
- All the entries assigned to the user's Site should be visible in the dropdowns
There are three ways to remove an entry from the dropdown menu. See the sections above for detailed steps.
- Replace it with a new entry, by editing the 'Code', 'Name' and 'Mnemonic' in the dictionary
- see Create Entries for Patient Location or Status - SSMT
- see Create Entries for Patient Location or Status - Manual
- Make it inactive for all Sites by checking the 'Inactive' box or setting 'Inactive' to Y in SSMT
- (The entry can be reativated at any time by unchecking the box or removing the Y)
- see Create Entries for Patient Location or Status - SSMT
- see Create Entries for Patient Location or Status - Manual
- Remove it from a Site
- see Assign Location or Status Entries to Site(s)
Correcting Order of Patient Rooms in Patient Location Picklist
- When creating patient locations within the V11 upgrade it is best to find a cohesive naming convention (i.e. Exam Room 1, Exam Room 2). However, the V11 system does not interpret the numbers by their numeric equivalence and rather as their numeric sequence (i.e. V11 does not read Exam Room 10 as the number 10, but rather as Exam Room 1-0 and thus will place Exam Room 10 following Exam Room 1 within your patient location picklist).
- If you are using a naming convention within a site that has more than 9 rooms (I.e. Patient Room 1-15) this issue is likely to occur and will appear like this:

- For accuracy and ease of V11 use, you will want to edit this so that your picklist is in numeric pattern for your users. As seen below:

- After completing your patient location configuration, log into your system as a user and check if your patient location picklist is in the correct sequential order. If it is not you will need to do the following:
1. Extract Site Location from SSMT, remembering to have ‘Show Headers in Extracted Data’ checked.
2. Format the extraction into excel. Your spread sheet will appear like this if you have a naming convention with more than 9 rooms and your picklist is not in the correct sequential order.

3. Organize the rooms into the order you wish for them to appear in your patient location picklist. Like So:

4. Notice the numbers within the Sequence Column are all “0”. The next step is to order the rooms by number within the Sequence column as you want them to appear in the picklist.

5. After replacing the zeros with the appropriate order number your excel spread sheet should now look like this:

6. The last step is to copy your excel spread sheet (without the column headers) and paste it back into SSMT.
7. Press Load Data.
8. You still need to completely log out of V11 and log back in as a user to check if your data loaded appropriately. If your picklist is in the correct numeric order then you are all set and can mark this as completed in your Build Work Book.
Return to V10 to V11.2 Build Workbook (BW)