Difference between revisions of "MEDITECH MPM Provider Creation Guide"
| Line 111: | Line 111: | ||
===Provider - Addl=== | ===Provider - Addl=== | ||
| − | The Provider- Addl page is used to define a | + | The '''Provider-Addl''' page is used to define a '''Providers’''' specialties (the primary is used when ordering referrals out of AOM), provider groups, alternate signers, and authorized signers. |
[[File:Provider Creation Page-Addl.png]] | [[File:Provider Creation Page-Addl.png]] | ||
| − | '''Specialties''': Enter the '''Provider’s''' specialties here designating the '' | + | '''Specialties''': Enter the '''Provider’s''' specialties here designating the ''Primary'' specialty. |
'''Provider Groups''': Add the '''Provider Groups''' defined in the '''Provider Group''' dictionary to which the '''Provider''' is associated. | '''Provider Groups''': Add the '''Provider Groups''' defined in the '''Provider Group''' dictionary to which the '''Provider''' is associated. | ||
Revision as of 18:09, 2 March 2016
Acute UNV User Dictionary
In setting up Provider access all users must be set up in the Acute Universe. Once they are created in the Acute UNV, they will flow to the Ambulatory HCIS where the MPM access can be set up.
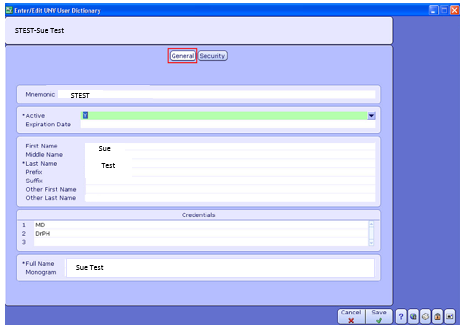
General
Use the General page to define the Provider's Mnemonic and enter their identifying information.
(Info Systems > Universe> Dictionaries > User > Enter/Edit )
Mnemonic: You need to enter the Mnemonic of the Provider being entered. The Mnemonic should be an abbreviation not the whole name, should be kept short, all caps and descriptive. Also remember to avoid spaces and special characters. An example of a Mnemonic for Sue Test could be STEST.
Active: To make the user Active enter Y, otherwise enter N.
Expiration Date: Enter the Date when the system should automatically inactivate this user.
First Name: Enter the first name of the Provider being created.
Middle Name: Enter the Middle Name of the Provider being created.
Last Name: Enter the Last Name of the Provider being created.
PWM Workgroup Dictionary
Create a Workgroup for the Provider or add the Provider to Clinic Workgroup to enable other users to see tasks for that Provider.
(Clinical > PWM > Dictionaries > Provider Workgroups > Enter/Edit)
Prefix: Enter a Prefix for the user (if applicable).
Suffix- Enter a Suffix for the user (if applicable).
Other First Name: Enter an Other First Name for the user. This will be used when the system performs name lookups.
Other Last Name: Enter an Other Last Name for this user, this is used when the system performs name lookups.
Credentials: Enter user’s Credentials (if applicable).
Full Name: The user’s Full Name will default based upon previously completed fields.
Monogram: Enter the Monogram for the user being created. This field has a three character limit and is used in forms and reports where a ten character Mnemonic would not fit.
Best Practice Recommendation: Follow the convention used by your Hospital for Provider and User Mnemonics when creating MPM Providers and Users for consistency.
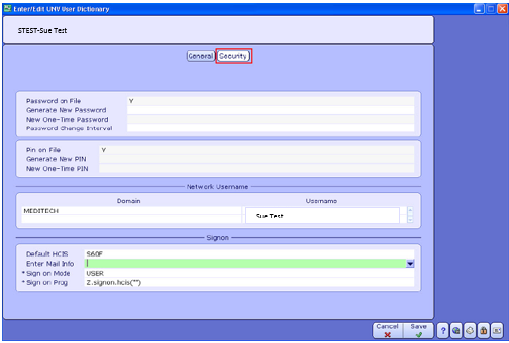
Security
All security settings and default sign on information is defined on the Security Page.
Password on File: This field will display Y/N to indicate whether a password is on file for the Provider.
Generate New Password: Enter Y in this field to generate a new one-time password for this user.
New One-Time Password: If Y is entered in the Generate New Password Field, the New One-Time Password will appear here.
Password Change Interval: Enter how often a user must change their Password. Usually an org based policy. For example, if users must change their Passwords every 2 months, the interval would be set for sixty days.
Pin on File: To indicate if a PIN is on file for the user, this field will display Y/N .
Generate New PIN: Enter Y in this field to generate a new one-time PIN for this user.
New One-Time PIN: If Y is entered in the Generate New PIN field the new one-time PIN will appear here. Note this Pin and have users reset them when they first sign into the system.
Domain: Enter the Domain that this user uses to sign-in to Windows.
Username: The Username being created will default here once the Domain has been entered above.
Default HCIS: Enter the default sign on HCIS for this Provider.
Sign on Mode: Enter USER for all Providers.
Sign on Prog: This defaults based on the Sign on Mode and should not be changed.
Acute MIS Person Dictionary
The MIS Person Dictionary is used to define access to various applications within the MEDITECH HCIS. The MEDITECH MIS Person Dictionary also allows for the creation of Providers.
( Info Systems > MIS > Dictionaries > Person/Profile > Person )
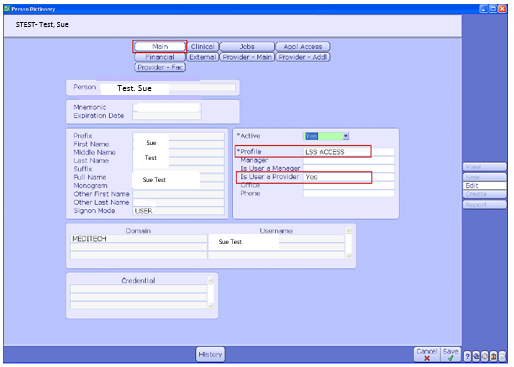
Main
Use the MIS Person Dictionary Main Page to designate a user as a Provider in the system.
Profile: Assign the user a Profile relating to their job function (e.g. Provider, FNP, Nurse,etc...)
Is User a Provider: Enter Y in this field for providers and clinical users to be enabled with electronic signature.
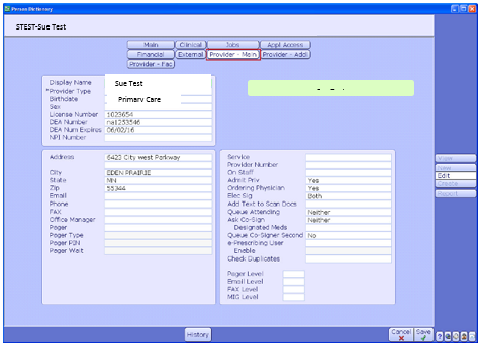
Provider - Main
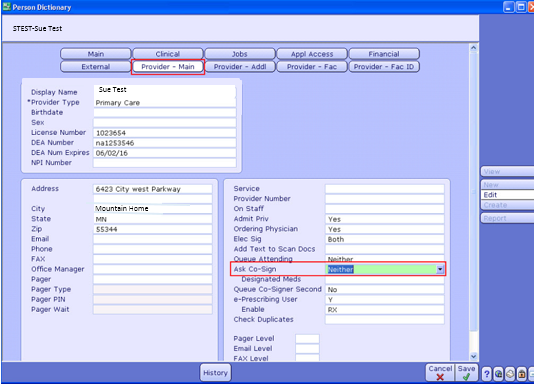
Use the Provider-Main page to enter Provider specific information for your organization’s Providers.
Provider Type: Enter Provider Type for the selected Provider.
License Number: Enter Provider’s License Number in this field.
DEA Number: Enter Provider’s DEA number to send on prescriptions.
Ask Co-Sign: Enter Neither for Providers who do not require a Cosigner.
Elec Sig: Enter Both to allow signing for Orders and Documents.
e-Prescribing User: Enter the DrFirst username for the Provider. You must contact your DrFirst Account Manager to register eligible Providers for electronic prescribing in order to obtain DRFirst username.
Enable: Enter RXREF to enable this Provider to receive both new and refill prescription requests within MPM.
Provider - Addl
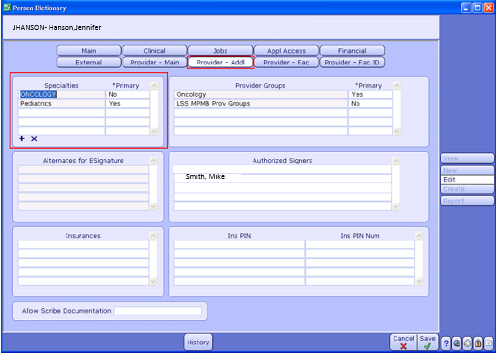
The Provider-Addl page is used to define a Providers’ specialties (the primary is used when ordering referrals out of AOM), provider groups, alternate signers, and authorized signers.
Specialties: Enter the Provider’s specialties here designating the Primary specialty.
Provider Groups: Add the Provider Groups defined in the Provider Group dictionary to which the Provider is associated.
Alternates: Enter the users who have authority to electronically sign documents for the Provider. The Alternate Signer’s signature will appear on the document or order. Leave blank for Providers that do not require Alternate signers.
Authorized Signers': Enter any users who will be able to sign for Providers. The Provider’s signature appears on the document or order, NOT the Authorized Signer’s. Leave blank for the 'Providers that do not need co-signers.
Ambulatory MIS User Maintenance Desktop
(Info Systems > MIS Database > User Maintenance Desktop)
Profiles Panel
User profiles allow system access to be quickly defined for a group of users. Maintenance of system access for that group of users is more efficient as well, if changes to that group’s access need to be made. If a user has unique access requirements the information entered on a profile may be entered on an individual user basis.
Standard Data
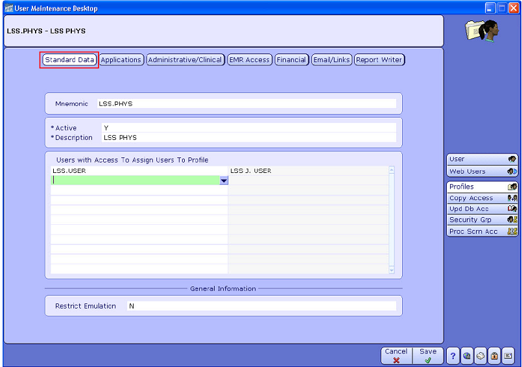
This page is used to define a mnemonic, users who may assign the profile, and if emulation of users assigned to the profile will be restricted.
Mnemonic: Enter the Mnemonic for the profile. Best practice is to use jobcategories/descriptions.
Users with Access to Assign: Enter Mnemonics of users with access to assign Profile to other users.
Restrict Emulation: Enter N to allow the Provider to be emulated by other users. This makes troubleshooting user-specific issues easier.
Applications
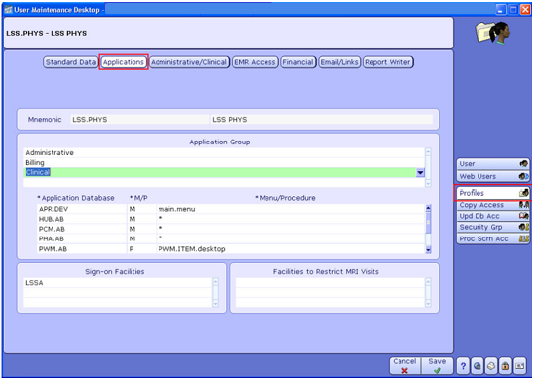
Use this page to define applications which will appear on the users menu when the user logs into the system.
Application Group: Administrative and Clinical are necessary for Providers who will need to have access to scheduling in the administrative applications and all of the clinical applications.
Application Database: Enter the Applications the Provider will need access. The necessary applications for providers are; APR, HUB, PCM, PWM, RAD, and RXM. Most applications have an (*) which indicates that Providers can access these applications without directly signing into a menu within that application. This is commonly known as ‘blind access’.
Best Practice Recommendation: Since PWM is the primary point of access for Providers, enter a P in the M/P field and PWM.ITEM.desktop in the Menu/Procedure field. This indicates that when PWM is selected from the clinical applications it will open directly to the Desktop, without displaying a menu.
Sign-on Facilities: Enter both the hospital and clinic facilities(i.e. billing databases) on which the Provider will be signing into the system.
Administrative/Clinical
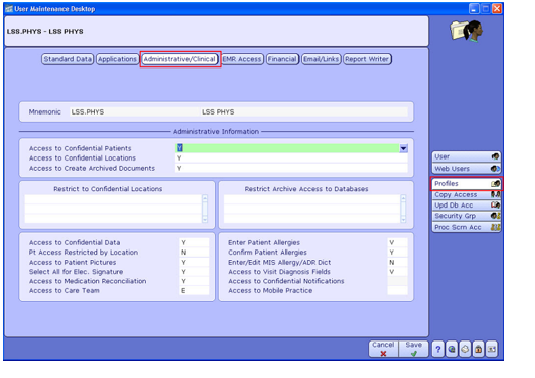
The Administrative/Clinical page defines the users access to clinical processes and defines the providers access to patient information flagged as confidential
Access to Confidential Patients: Enter Y for all Providers. This provides access to Confidential Patient charts.
Access to Confidential Locations: Enter Y to give the Provider access to view documentation from Confidential Locations.
Access to Create Archived Documents: Enter Y. Grants access to Archived Documents and Reports.
Access to Confidential Data: Enter Y to give the Provider access to view any Confidential Data on a patient or from a location that may not otherwise be confidential.
Pt Access Restricted by Location: Enter N to give the Provider access to see all relevant data associated with PPR accounts.
Access to Patient Pictures: Enter Y to allow users to see Patient Pictures during scheduling and registration to identify the patient.
Select All for Elec Signature: Enter Y automatically select all documents eligible for Electronic Signature when the Provider accesses the sign list.
Access to Medication Reconciliation: Enter Y to give the Provider access to use the Reconcile Medications check box to reconcile medication from a document or the AOM profile.
Access to Care Team: Enter E to give the Provider access to edit members of the Care Team for patients.
Enter Patient Allergies: Enter V to give the Provider access to enter Verified Allergies on a patient.
Verify Patient Allergies: Enter Y to give the Provider access to Verify Instances of Allergies previously entered as unverified allergies.
Access to Visit Diagnosis Fields: Enter Y to give the Provider access to enter Diagnoses on patients during a visit or from the chart.
Access to Confidential Notifications: Enter Y to give the Provider access to see Confidential Notifications on the PWM Desktop.
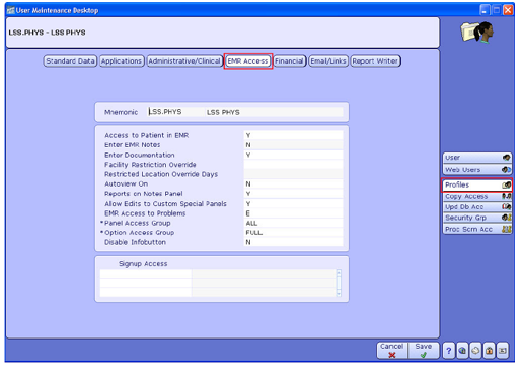
EMR Access
Use the EMR Access page to control access to patient data in the Enterprise Medical Record (EMR) and give access to enter documentation on patients.
Access to Patient in EMR: Enter Y to give the Provider access to view patients in the EMR.
Enter EMR Notes: Entering N gives the Provider access to the Enter Documentation field.
Enter Documentation: Enter Y to give access to the Provider to Document on patients.
Allow Edits to Custom Special Panels: Enter Y to give the Provider access to Add or Remove information from Custom Special Panels .
EMR Access to Problems: Enter E to allow Provider access to Edit and View Problems on the Problem List.
Panel Access Group: To define access to Panels in the EMR,enter the Mnemonic of the EMR Panel Access Group for Providers in this profile.
Option Access Group: Enter the Mnemonic of the EMR Option Access Group for Providers in this profile to define available Options while in the EMR.
User Panel
The User panel is used to define the specific information for users within MPM.
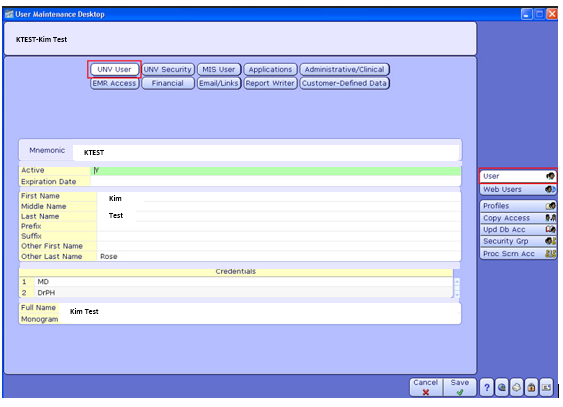
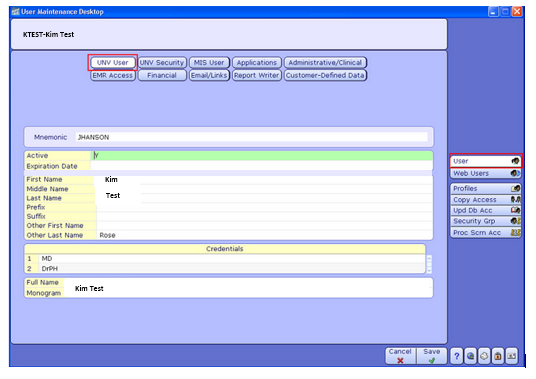
UNV User
The UNV User dictionary displays the user information created in the MEDITECH UNV User dictionary. Mnemonic: Enter the Mnemonic of the user created in the MEDITECH UNV User dictionary. This will pull in the user’s information from that dictionary into this dictionary.
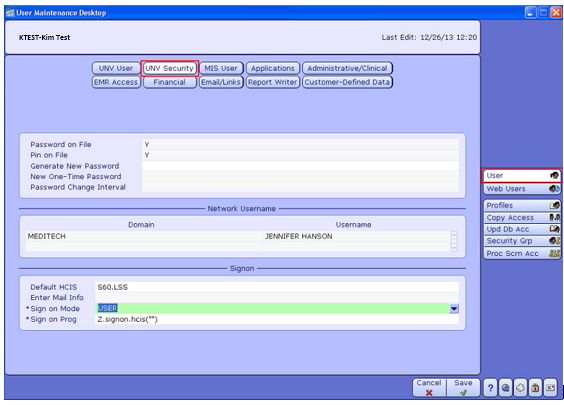
UNV Security
The user information created in the MEDITECH UNV User dictionary is displayed in this page. Assigned in this dictionary is the separate password that is needed for the LSS HCIS . You can eliminate the need for a separate LSS HCIS password by completing the Network Authentication Setup in the MEDITECH UNV User Dictionary.
Generate New Password: Enter Y to generate a one-time password. At the first sign-in, the provider will be prompted to reset password.
Domain: Enter the hospital Domain where the system is housed. If the Network Authentication Setup is completed in the MEDITECH User dictionary, this is automatically populated.
Username: To utilize single signon, enter the network Username for the Provider . This is automatically populated if the Network Authentication Setup is completed in the MEDITECH User Dictionary.
Default HCIS: To make entry into the system more efficient, enter the HCIS the Provider will most often be working in.
Sign on Mode: Enter User in this field. This automatically defaults the Sign on Prog field accordingly.
MIS User
This page is used to define the profile (discussed earlier), supervisor, user monogram, security level to modify user information in the system.
Profile: Using the convention the profiles were built, assign the Profile to the Provider. A look up to the LSS MIS Profile dictionary is available.
Supervisor: If applicable, enter the Mnemonic of the Supervisor for the selected Provider.
Security Level: Enter OWN to allow edit access their own user.
Best Practice: It is best to have Designated Individuals with access to edit users.
This User is Provider: This field defaults based on the set up in the Acute MIS Person dictionary.
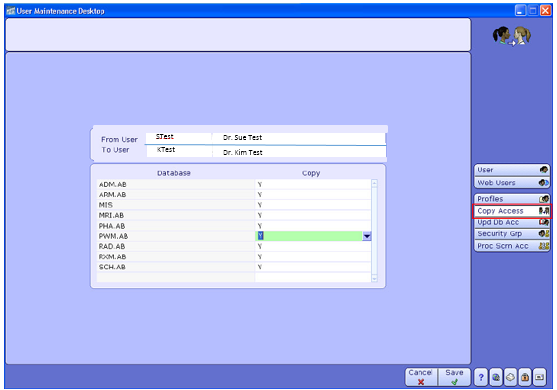
Ambulatory MIS Copy Access Routine
This routine is used to quickly copy application access from one provider to another.
From User: Enter the Mnemonic of the Provider you want to copy from.
To User: Enter the Mnemonic of the Provider you want to copy to.
Database: All application databases which the From user has access will appear under this header.
Copy: To indicate whether application access is to be Copied for each database, enter Y. Enter N to indicate no Copy access from listed databases.
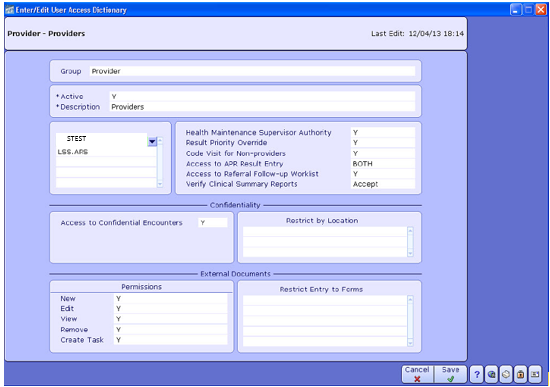
APR Access Dictionary
This dictionary is used to define user access within the APR application and the user’s ability to scan documents into the system. Use the Edit User Access routine to add a user to an existing APR access group.
(Clinical > APR > Dictionaries > Access > Enter/Edit)
Health Maintenance Supervisor Authority: Enter to allow the Provider to edit and delete items in the patient’s Health Maintenance record.
Result Priority Override: Enter to allow the Provider to override priority assigned to results coming from LAB.
Access to APR Result Entry: Enter Y to grant access to 'APR Result Entry routine to enter results received from an outside vendor.
Access to Referral Worklist: Enter Y to allow the Provider access to the Referral Worklist.
Access to Confidential Encounters: Enter Y for all Providers.
External Documents: Enter Y or N for each category of document to grant/deny access to provider to add or modify external scanned documents in the APR External Documents Routine.
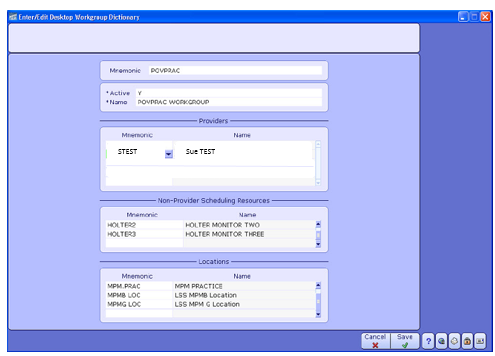
PWM Workgroup Dictionary
Create a Workgroup for the Provider. To enable other users to see tasks for the Provider, add the Provider to the Clinic Workgroup.
(Clinical > PWM > Dictionaries > Provider Workgroups > Enter/Edit)
Mnemonic: Enter a Mnemonic for the PWM workgroup to be created or edited
Providers: Enter a Mnemonic of the Provider being added to the PWM workgroup.
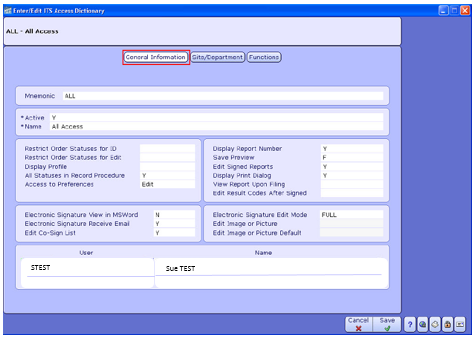
ITS Access Dictionary
To give Providers access to the Sign List and the ability to edit signed documents, use this dictionary.
(Clinical > RAD > Dictionaries > A-O > Access > Enter/Edit)
User: Enter the User Mnemonic of the Provider that needs access to the Sign List.
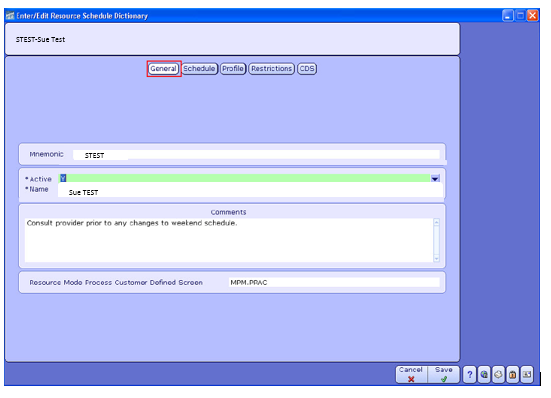
SCH Resource Schedule Dictionary
This page is used to identify the resource available to be scheduled from the scheduler’s desktop.
(Administrative > SCH > Dictionaries > Resource and Schedule > Resource Schedules > Enter/Edit)
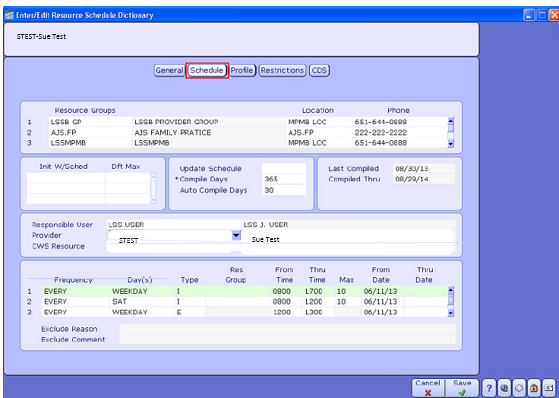
Schedule
Setup the Provider’s availability to take appointments, including weekly days off, holidays and regularly scheduled vacations.
Resource Groups: Enter the Resource Groups where the Provider is scheduled to work. Associate as many Resource Groups with a Provider as necessary.
Compile Days: To determine how far into the future appointments may be scheduled for this Provider, enter a number, up to 999.
Responsible User: Enter the Provider’s User Mnemonic.
Provider: Enter the Provider Mnemonic.
Frequency: Enter the schedule element which corresponds to the provider’s availability during the days/times defined in the following columns.
Days: Days of the week this availability is active.
Type: Enter I (Include), E (Exclude) or H (Hospital) to indicate how this part of the schedule should be seen on the desktop.
Res Group: Enter the resource group for which this availability is to be used.
Max: Enter the maximum number of appointments that can be booked for this period, defaults in this field.
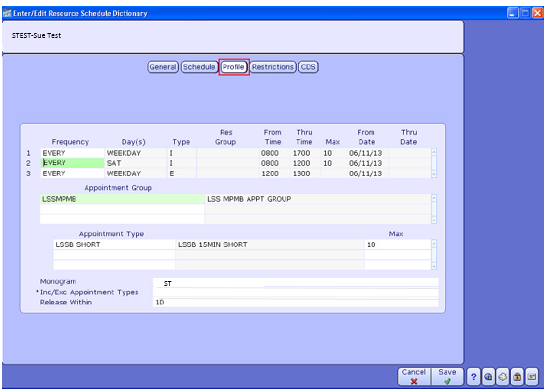
Profile
This page is used to attach Appointment Profiles to appointment types in the Resource Schedule Dictionary. To exclude appointment types from the appointment search, create an Appointment Profile. Once the Appointment Profile has been created only certain appointment types can be included or excluded at specific times in a resource's basic schedule.
A Monogram when associated with a Profile quickly identifies each resource’s Profile in Appointment Book Mode.
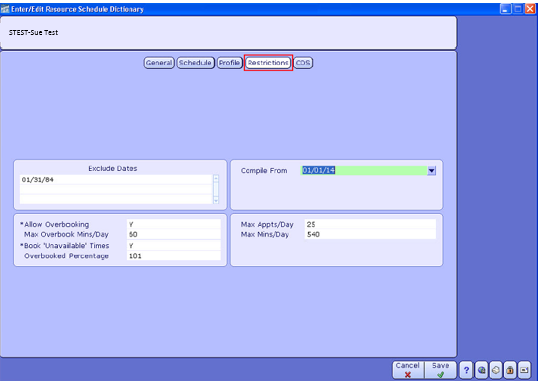
Restrictions
Use this screen of the Resource Schedule Dictionary to determine if a resource can be overbooked and scheduled during unavailable times.
Ambulatory UNV Client Dictionary
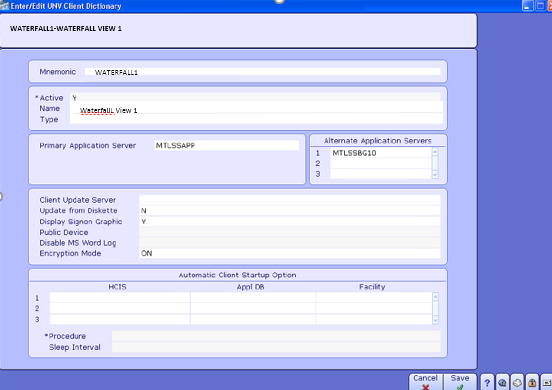
This dictionary is used to enter the Provider machine as a client allowing MEDITECH to reference it when the Provider uses the electronic signature routine.
( Info Systems > Universe > Dictionaries > Client (Special) > Enter/Edit)
Mnemonic: Enter the Mnemonic(s) of the client(s) from which the provider will be using the sign list.
Name: Enter a display Name for the client.
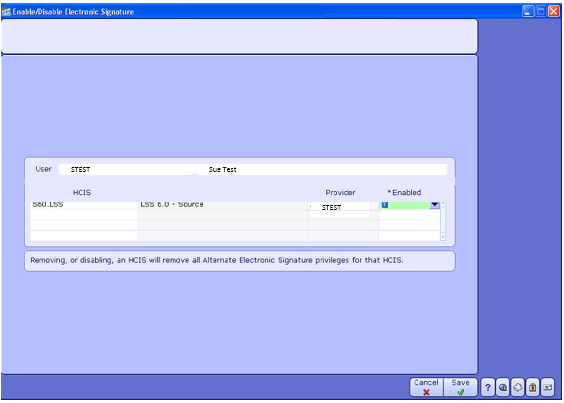
Ambulatory UNV User Enable/Disable E-Signature
In the target ambulatory HCISs, available from the PWM Desktop and EAR chart, use this dictionary to enable a provider to use the sign list routine.
(Info Systems > Universe > Dictionaries > User (Special) > Enable/Disable Electronic Signature)
Dictionary Setup For Providers Requiring Co-Signature
The next section outlines the three different methods required for Providers for co-signature to be setup in the system.
Providers Who Require Co-Signature For all Documents
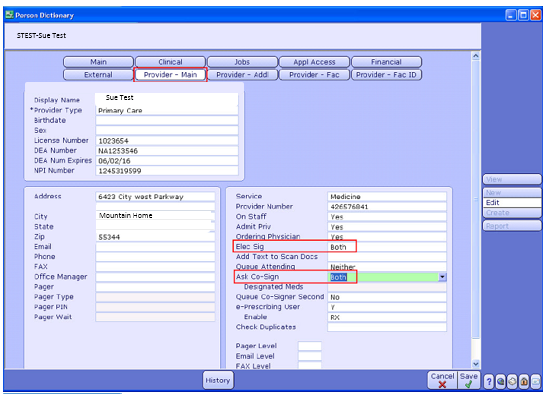
Acute MIS Person Dictionary, Provider - Main
This page is used to designate whether the Provider can Electronically Sign documents, orders, or both, AND if they require a Co-signature on ALL of the documents they sign.
(Info Systems > MIS > Dictionaries > Person/Profile > Person)
Elec Sig: Entering B allows the Provider to sign Both orders and documents.
Ask Co-Sign: Enter B or R to require this provider to select a cosigner for all documents they sign.
Ambulatory MIS ES Co-Signers Dictionary
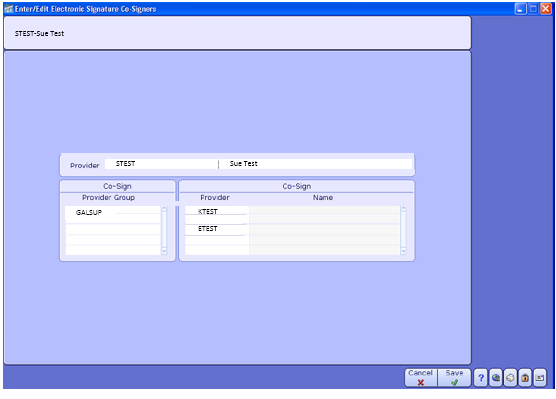
Use this dictionary to designate a provider as co-signer for provider groups and/or individual providers requiring a cosigner on all of their documents.
(Info Systems > MIS > Clinical Dictionaries (P-Z) > Providers ES > Enter/edit ES Co-Signers)
Provider: Enter the mnemonic of the provider who will be co-signing on documents for the providers requiring a co-signature.
Provider Group: Enter the mnemonic of a provider group(s) requiring a cosigner.
Provider: Enter the mnemonics of providers requiring a co-signature.
Providers Who Require Co-Signature By Facility
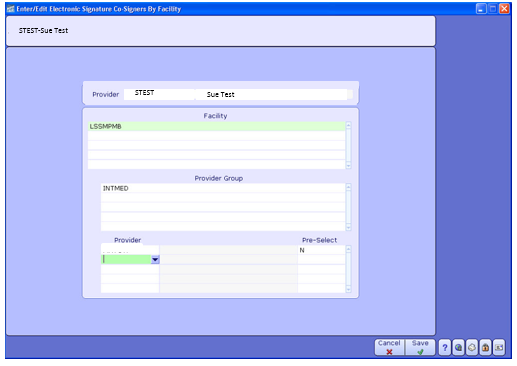
Ambulatory MIS Provider ES Co-Signers by Facility
This dictionary is used to set up facility-specific designated Co-Signers for any Provider that requires a Co-Signature.
Provider: Enter the Mnemonic of the Provider who will be Co-Signing for resident, physician assistant, and nurse practitioner documents.
Facility: Enter the name of the facility where the Provider will be co-signing on documents.
Provider Group: Enter the Provider Group for the group of providers that require Co-Signatures.
Providers: Enter Mnemonics of individual Providers requiring Co-Signatures on documents they author.
Pre-Select: Enter Y to check the box for the Co-Signing Provider to select them by default if other Providers are setup to Co-Sign for the same Provider Group or Provider in that facility.
APR Random Co-signature Assignment
Acute MIS Person Dictionary, Provider-Main
Ask Co-Sign: For the Random Co-Signature Assignment to work properly, enter N.
APR Customer Parameters Dictionary
Use this dictionary to make Providers requiring Co-Signature on a percentage of their documents available for the Random Co-Signature Assignment Routine.
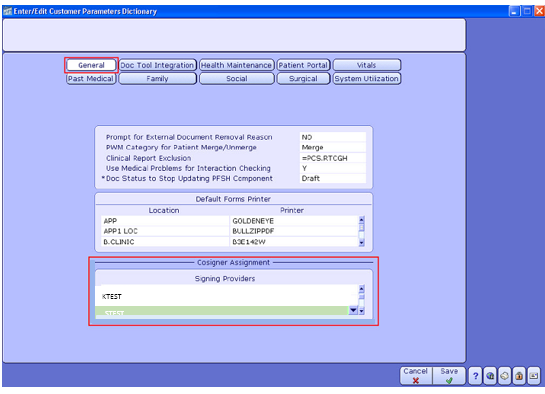
Signing Providers: Enter the Mnemonics of Providers requiring a percentage of their documents to be 'Co-Signed.
