Difference between revisions of "Map HMP Dictionary Entries to OID"
Max.Stroud (talk | contribs) |
|||
| Line 12: | Line 12: | ||
Once loaded, select the 'Unmapped Custom HMP Items Report'. This will prompt you with the print dialog. If you want to print the report, simply select the printer and press print. If you want to export the data to excel, hit preview and then export on the print preview screen. | Once loaded, select the 'Unmapped Custom HMP Items Report'. This will prompt you with the print dialog. If you want to print the report, simply select the printer and press print. If you want to export the data to excel, hit preview and then export on the print preview screen. | ||
| − | This list | + | This list is all HMP items added to a Patient in v10 that do not correlate to an OCD item in V11. |
==Step 2: Determine if existing OID entries are present== | ==Step 2: Determine if existing OID entries are present== | ||
| − | For each of the HMP items in the report, the first step is to identify if an Orderable Item exists. | + | For each of the HMP items in the report, the first step is to identify if an equivalent Orderable Item exists. For example, if one of the items is PSA and there is a preexisting OID item in the system, you would not need to add that item to the OID dictionary because it exists. |
| + | For each of the items that do not have a corresponding match in the OID dictionary, you would need to create a new OID entry for future use. | ||
| + | ==Step 3: Map the items to the OCD dictionary== | ||
| + | The next step is to ensure that the OID items created for the custom HMP items are properly mapped to the OCD. To do this, login as a user that has access to TWAdmin and navigate to the Concept Mapping/OCD Mapping page. From this screen, you would find the OID item and the corresponding OCD item. Highlight both items and select 'Map'. | ||
| − | + | [[Image:OCDDAshboardHMP.JPG]] | |
| − | + | Once each custom item has been mapped, you will have completed that portion of the setup. | |
| − | + | ==Step 4: Complete Unmapped HMP items to complete setup== | |
| + | The remaining HMP items that are not mapped would be the Allscripts delivered HMP items. The v11 upgrade automatically links v10 HMP items that were delivered by Allscripts to the OCD, but you must still tell the system which OID item in your system that corresponds to. If you have completed your OID to OCD mapping all ready, this should be complete, but to verify the completion follow the steps described below. | ||
| − | + | # Log in as a user that has access to the TWAdmin Workplace | |
| − | + | # Navigate to the Concept Mapping/OCD Mapping page | |
| − | + | # Select the OCD Based Mapping option | |
| + | # Select Unmapped V10 HMP Items in the Filter By drop down list. | ||
| − | + | This will return all items that exist in the OCD and are defined as HMP items, but have not been tied to an OID item. | |
| − | + | [[Image:OCDHMPUnmapped.JPG]] | |
| − | |||
| − | |||
| − | + | For each of the items displayed on the left hand side of the screen, you must find a corresponding item in the OID dictionary. If your OID is populated from you lab and other vendors, the items should exist in the OID. If you find that items cannot be mapped, you must add the appropriate item to the OID and map them. | |
| − | |||
| − | + | ==Run the MP Migration Script== | |
| − | + | The last setup step is to run the Migration script to complete the upgrade of HMP items to v11. This will ensure that all patient HMP items properly correlate to v11 items. To do this: | |
| − | + | #Navigate to the Concept Mapping/Dashboard screen. | |
| − | + | #Click the HMP Migration Script link in the middle of the page. This script will generate the order reminders based on the mapped OID items. This process will take a few minutes to complete and there is no indication as to when it is complete, but it does run. | |
| − | |||
| − | |||
| − | |||
| − | |||
[[Image:HMP5.jpg]] | [[Image:HMP5.jpg]] | ||
| − | + | ==Verify the data== | |
| − | + | The last step is to verify the data. To do this, you must look at your v10 system and document HMP items for patients in that system. Make sure that the items were added prior to the copy of live that is being used in the v11 upgrade system. Once you have a good list of items, compare them to the v11 upgrade system and ensure that the patient HP items are still appearing and that they look appropriate. If you notice any issues, please provide the example to your upgrade team for review. | |
| − | |||
| − | |||
| − | |||
| − | |||
| − | |||
| − | |||
| − | |||
| − | |||
| − | |||
| − | |||
| − | |||
| − | |||
| − | |||
| − | |||
| − | |||
| − | |||
| − | |||
| − | |||
| − | |||
| − | |||
| − | |||
| − | |||
Revision as of 14:28, 24 October 2008
Description
Upgrading from v10 to v11 requires a conversion of HMP items as well. In v10 HMP items are a unique dictionary that allows providers to track patient maintenance items over time. This was a module that worked on it's own and was not integrated with the Order module. In v11 HMP items go away for the most part. HMP items are now actually Orderable items and become integrated into the Order Module. This allows for users to create reminders for future items and to track regularly needed health maintenance items within TouchWorks.
The step here is intended to ensure that HMP items have been properly upgraded to v11 orderable items and that they are properly mapped to the OCD dictionary. For the most part, the standard Allscripts delivered v10 HMP items upgrade properly and the focus should primarily be on custom added HMP items. This article will step through this process and ensure that HMP items are accounted for in v11.
Step 1: Run the Unmapped Custom HMP Items Report
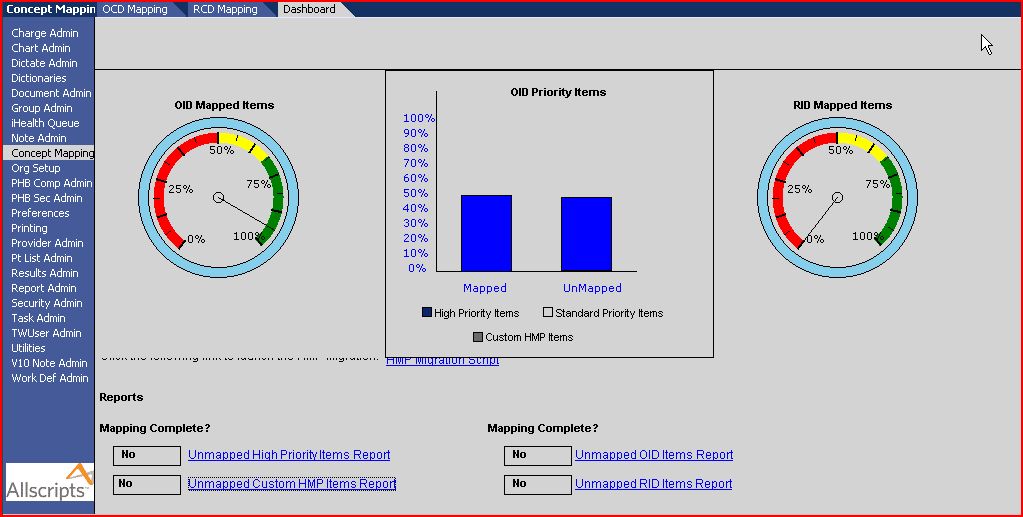
TouchWorks is delivered with a report to identify the HMP items that need to be manually mapped to the OID and or OCD. To run the report, login as a user that has access to the TWAdmin workplace and navigate to the Concept Mapping/Dashboard screen.
Once loaded, select the 'Unmapped Custom HMP Items Report'. This will prompt you with the print dialog. If you want to print the report, simply select the printer and press print. If you want to export the data to excel, hit preview and then export on the print preview screen.
This list is all HMP items added to a Patient in v10 that do not correlate to an OCD item in V11.
Step 2: Determine if existing OID entries are present
For each of the HMP items in the report, the first step is to identify if an equivalent Orderable Item exists. For example, if one of the items is PSA and there is a preexisting OID item in the system, you would not need to add that item to the OID dictionary because it exists.
For each of the items that do not have a corresponding match in the OID dictionary, you would need to create a new OID entry for future use.
Step 3: Map the items to the OCD dictionary
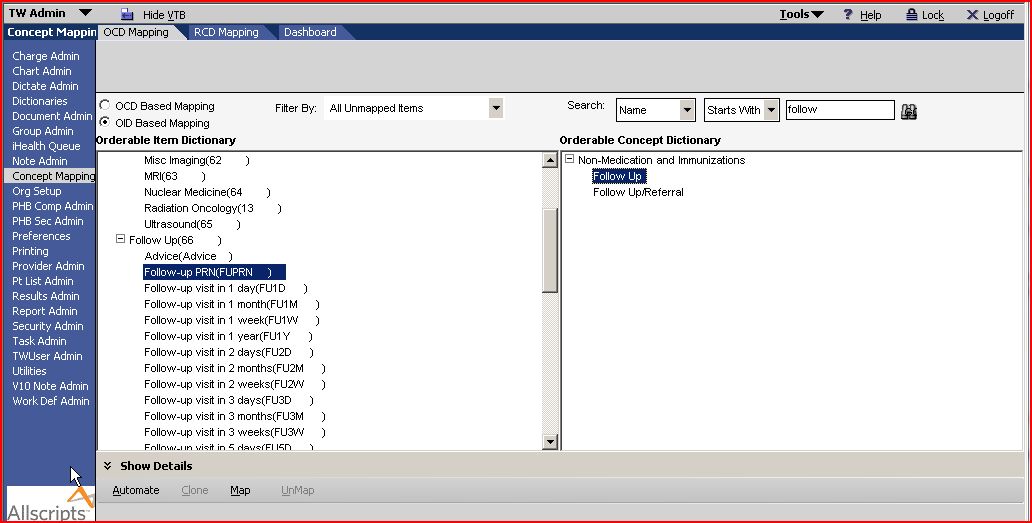
The next step is to ensure that the OID items created for the custom HMP items are properly mapped to the OCD. To do this, login as a user that has access to TWAdmin and navigate to the Concept Mapping/OCD Mapping page. From this screen, you would find the OID item and the corresponding OCD item. Highlight both items and select 'Map'.
Once each custom item has been mapped, you will have completed that portion of the setup.
Step 4: Complete Unmapped HMP items to complete setup
The remaining HMP items that are not mapped would be the Allscripts delivered HMP items. The v11 upgrade automatically links v10 HMP items that were delivered by Allscripts to the OCD, but you must still tell the system which OID item in your system that corresponds to. If you have completed your OID to OCD mapping all ready, this should be complete, but to verify the completion follow the steps described below.
- Log in as a user that has access to the TWAdmin Workplace
- Navigate to the Concept Mapping/OCD Mapping page
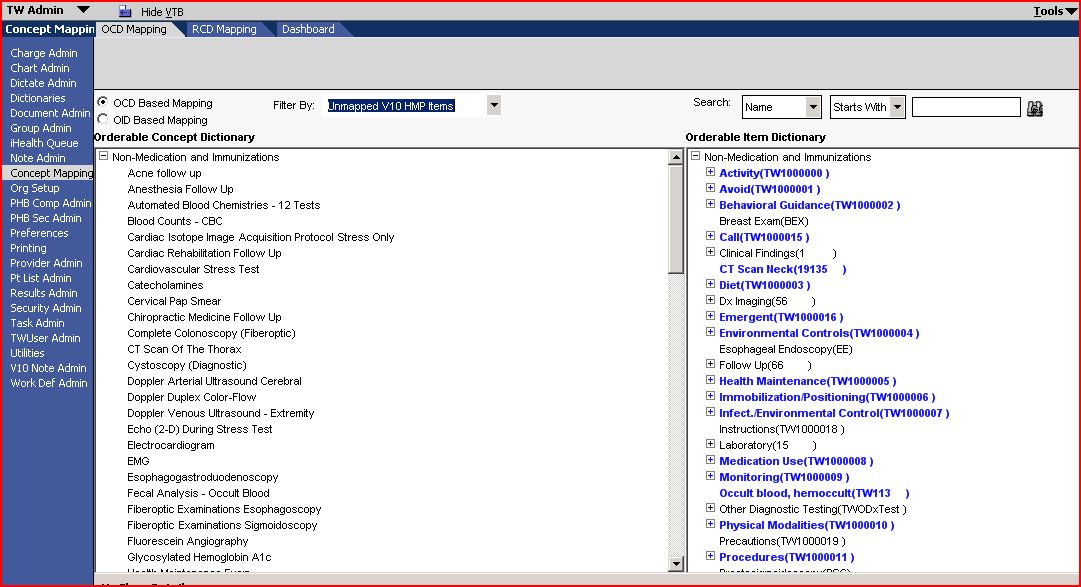
- Select the OCD Based Mapping option
- Select Unmapped V10 HMP Items in the Filter By drop down list.
This will return all items that exist in the OCD and are defined as HMP items, but have not been tied to an OID item.
For each of the items displayed on the left hand side of the screen, you must find a corresponding item in the OID dictionary. If your OID is populated from you lab and other vendors, the items should exist in the OID. If you find that items cannot be mapped, you must add the appropriate item to the OID and map them.
Run the MP Migration Script
The last setup step is to run the Migration script to complete the upgrade of HMP items to v11. This will ensure that all patient HMP items properly correlate to v11 items. To do this:
- Navigate to the Concept Mapping/Dashboard screen.
- Click the HMP Migration Script link in the middle of the page. This script will generate the order reminders based on the mapped OID items. This process will take a few minutes to complete and there is no indication as to when it is complete, but it does run.
Verify the data
The last step is to verify the data. To do this, you must look at your v10 system and document HMP items for patients in that system. Make sure that the items were added prior to the copy of live that is being used in the v11 upgrade system. Once you have a good list of items, compare them to the v11 upgrade system and ensure that the patient HP items are still appearing and that they look appropriate. If you notice any issues, please provide the example to your upgrade team for review.


