Difference between revisions of "Securelink gatekeeper setup"
| Line 14: | Line 14: | ||
#From that machine, browse to Galen’s SecureLink Server, located at http://securelink.galenhealthcare.com. | #From that machine, browse to Galen’s SecureLink Server, located at http://securelink.galenhealthcare.com. | ||
#From that address, you should see a screen that looks like this: | #From that address, you should see a screen that looks like this: | ||
| − | #:[[ | + | #:[[Image:Galensecurelink.PNG]] |
| − | #From this screen | + | #From this screen you will download the Gatekeeper software onto your server. Click "Download Now" in order to download the Gatekeeper software, as shown in the highlighted area in the picture above: |
| − | |||
#Choose to download the '''Windows''' Gatekeeper: | #Choose to download the '''Windows''' Gatekeeper: | ||
| − | #:[[File: | + | #:[[File:Galensecurelink2.PNG]] |
#Save the executable file to the Desktop of the server: | #Save the executable file to the Desktop of the server: | ||
#:[[File:slimage4.jpg]] | #:[[File:slimage4.jpg]] | ||
Revision as of 14:28, 5 July 2013
Description
Galen Healthcare uses a solution called Securelink to allow us to connect to maintain, upgrade and monitor your Allscripts Enterprise servers.
Installing Securelink on your Allscripts Enterprise network is a two step process: Once these two steps are complete, Galen will be able to securely access your machines without the need for additional VPN software or proprietary clients. Here is a detailed description of the two steps:
- Install the Securelink Gatekeeper software.
- Activate Gatekeeper access.
If you encounter any problems along the way, you can contact your Galen resource or by email at help@galenhealthcare.com.
Detailed Instructions
Install the Securelink Gatekeeper software
The Securelink Gatekeeper needs to be installed on a minimum of one server in your Allscripts Enterprise environment, but we recommend installing it on two servers in case one of them becomes unavailable.
- Determine which machine you'd like to install your Gatekeeper on.
- From that machine, browse to Galen’s SecureLink Server, located at http://securelink.galenhealthcare.com.
- From that address, you should see a screen that looks like this:
- From this screen you will download the Gatekeeper software onto your server. Click "Download Now" in order to download the Gatekeeper software, as shown in the highlighted area in the picture above:
- Choose to download the Windows Gatekeeper:
- Save the executable file to the Desktop of the server:
- Run the executable SLinkGalen.exe that you just downloaded. Click Next to begin the installation:
- Choose the Standard installation:
- When the install has concluded, click 'Finish' to launch the gatekeeper. This will launch the Gatekeeper menu in a browser:
- After the Gatekeeper performs its connectivity test, enter the registration code provided by Galen Healthcare Solutions and click ‘Register’
- Enter your email address if you want to be notified when Galen is connecting to your servers. You can add additional addresses at any time by clicking the email icon in the upper right hand corner of the screen:


Activate Gatekeeper access
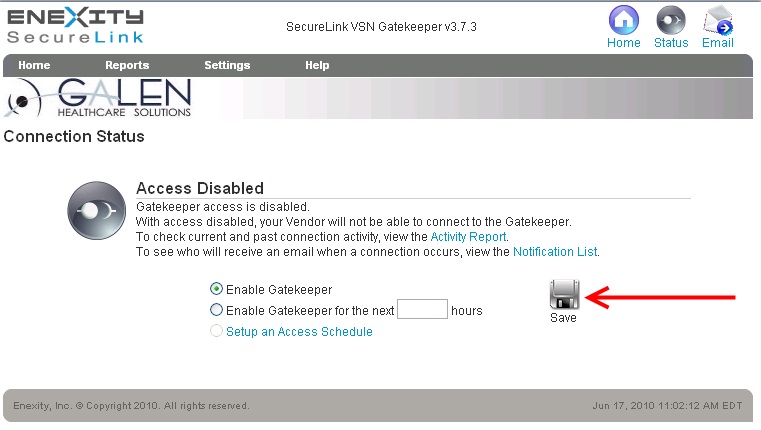
- Click the Status icon:
- Click the Access button. Enable access, either indefinitely, or for a period of time to allow your vendor to test connectivity.
- Remember to click Save to save the changes and enable your Gatekeeper.
- In the future, you may launch the gatekeeper from the Start menu, or via the web at http://<gatekeeperIP>:4680, where <gatekeeperIP> refers to the IP address of the gatekeeper machine.
- From the gatekeeper UI, you may view reports at any time by clicking the Reports icon, and viewing the full activity report:
- You can enable or disable access via the Status icon, located in the upper right hand corner of every page.
- Congratulations! Your gatekeeper is successfully configured.


