Difference between revisions of "Tile View in Note Authoring Workspace Configuration"
Ellen.Thomas (talk | contribs) (Created page with "== Tile View in Note Authoring Workspace Configuration== Overview: the Tile View function allows users view and use additional tab contents from the clinical desktop while vi...") |
Ellen.Thomas (talk | contribs) |
||
| Line 9: | Line 9: | ||
*Select '''Add/Edit Note View''' | *Select '''Add/Edit Note View''' | ||
| − | [[File:Tile View 1. | + | [[File:Tile View 1.png]] |
* Select '''View 2''' for a simple split screen in the NAW (Note Authoring Workspace) | * Select '''View 2''' for a simple split screen in the NAW (Note Authoring Workspace) | ||
* Uncheck the box for '''Open in Full Screen Display'''. | * Uncheck the box for '''Open in Full Screen Display'''. | ||
| − | [[File:Tile view 2. | + | [[File:Tile view 2.png]] |
The view has been created and can now be configured to meet the users preference for tabs they would like in each component. | The view has been created and can now be configured to meet the users preference for tabs they would like in each component. | ||
| Line 25: | Line 25: | ||
* Repeat the preceding steps for all tabs to be removed. | * Repeat the preceding steps for all tabs to be removed. | ||
| − | [[File:Tile view 3. | + | [[File:Tile view 3.png]] |
Configuration Step 2: Add the removed Components into the left Note Component: | Configuration Step 2: Add the removed Components into the left Note Component: | ||
| Line 36: | Line 36: | ||
Tab order can be changed using the "drag and drop" method. Right click on the tab and drag it to the desired location. | Tab order can be changed using the "drag and drop" method. Right click on the tab and drag it to the desired location. | ||
| − | [[File:Tile view 5. | + | [[File:Tile view 5.png]] |
When the user opens a note it will default to the Note Authoring Workspace. Use the next steps to allow your users to toggle to the tile view you have just created. | When the user opens a note it will default to the Note Authoring Workspace. Use the next steps to allow your users to toggle to the tile view you have just created. | ||
| Line 43: | Line 43: | ||
* Click '''Apply''' to save your changes. | * Click '''Apply''' to save your changes. | ||
| − | [[File:Tile view 6. | + | [[File:Tile view 6.png]] |
Configuration Step 3: Test your view in the Application: | Configuration Step 3: Test your view in the Application: | ||
| Line 50: | Line 50: | ||
* Click on the '''Tile View''' icon in the upper right corner under the binoculars. | * Click on the '''Tile View''' icon in the upper right corner under the binoculars. | ||
| − | [[File:Tile view 7. | + | [[File:Tile view 7.png]] |
The components can be resized by hovering over the edges between the components and dragging to the left or right. | The components can be resized by hovering over the edges between the components and dragging to the left or right. | ||
Remember, your Note view will not be altered but the user can toggle to the tile view and work within both the NAW and the clinical desktop components at the same time! | Remember, your Note view will not be altered but the user can toggle to the tile view and work within both the NAW and the clinical desktop components at the same time! | ||
Revision as of 18:34, 11 December 2013
Tile View in Note Authoring Workspace Configuration
Overview: the Tile View function allows users view and use additional tab contents from the clinical desktop while viewing and working within the Note Authoring Workspace.
Follow these steps to configure this note view.
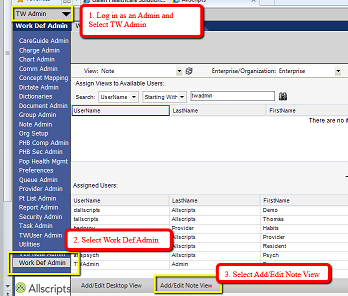
- Log in to TouchWorks as an administrative user.
- Click Work Def Admin from the vertical toolbar.
- Select Add/Edit Note View
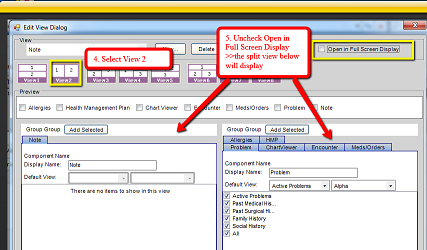
- Select View 2 for a simple split screen in the NAW (Note Authoring Workspace)
- Uncheck the box for Open in Full Screen Display.
The view has been created and can now be configured to meet the users preference for tabs they would like in each component. (Example: Our providers wanted to be able to view the Chart Viewer, Problems, Meds and Orders while working within the note.)
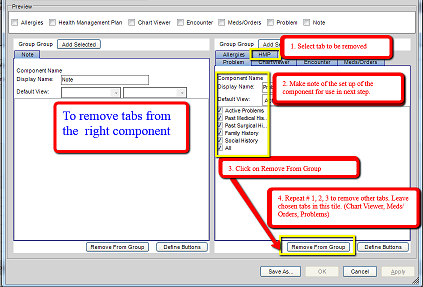
Configuration Step 1: Remove unwanted tabs from component on right:
- Select the tab to be removed
- Make note of the set up of the component for use in the next step.
- Click on the Remove from Group button
- Repeat the preceding steps for all tabs to be removed.
Configuration Step 2: Add the removed Components into the left Note Component:
- Place a check in the box for the needed group.
- Click on the Add Selected Button
- Verify that the component is set up as noted in #2 of the previous screen.
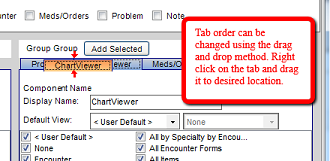
Tab order can be changed using the "drag and drop" method. Right click on the tab and drag it to the desired location.
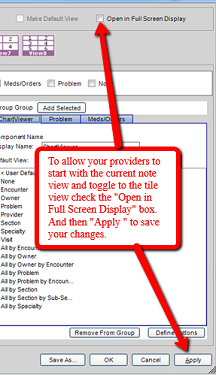
When the user opens a note it will default to the Note Authoring Workspace. Use the next steps to allow your users to toggle to the tile view you have just created.
- Check the box next to Open in Full Screen Display button
- Click Apply to save your changes.
Configuration Step 3: Test your view in the Application:
- Log in as a User
- Open a note
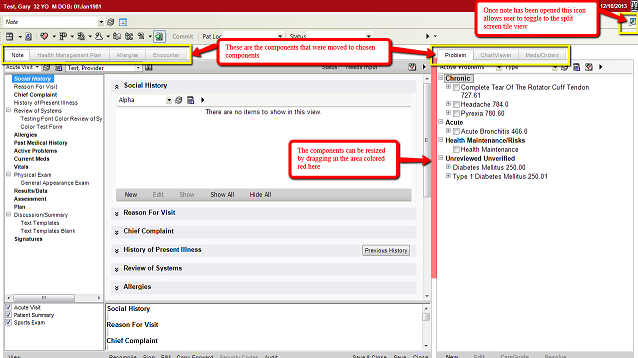
- Click on the Tile View icon in the upper right corner under the binoculars.
The components can be resized by hovering over the edges between the components and dragging to the left or right.
Remember, your Note view will not be altered but the user can toggle to the tile view and work within both the NAW and the clinical desktop components at the same time!
