Vitals Configuration
Revision as of 19:51, 28 May 2008 by Michael.Ficociello (talk | contribs)
Overview
- (oderable vs non-orderable Orderable Items give axample of each?)
(Are all vital signs orderable? for example is a comment orderable?)
- All Vitals are Orderable Items
- All Orderable Items must be mapped to a resultable item
- A Complex Orderable Item is an Orderable Item that can contain other Orderable Items
- A Complex Orderable Item does not needed to be mapped to a resultable item because its children are already mapped to resultable iems.
- Both the parent and child Orderable Items are contained in the same dictionary, the OID
- A Complex Orderalbe Item containing vitals is called a Panel on the back end and a View on the front end.
High Level Process
- Create Resultable Items for any new vital signs
- Create Orderable items for the new vital signs and map to the corresponding resultable items
- Create Complex Orderable Items (panels) and Add Orderable Items to create views
Create Resultable Item
All Orderable Items must have a Resultable Item
- TWAdmin > Dictionaries > Dictionary: Resultable Item
- Click 'Search' at the bottom of the screen to show/hide the search bar
- Search for the needed item before creating a new item. (use 'Contains')
- If the needed item already exists in the RID no further action is needed in the RID.
- To create a new item click 'Add'
- Enter 'Code', 'Name', 'Mnemonic' and 'Display Name'
- The Code is the database key and must be unique
- Always make 'Code' and 'Mnemonic' the same.
- The code and mnemonic are limited to 10 characters and no spaces between characters
- Always use the organization mnemonic as the prefix. This will make it easy to tell which items were created for the organization. For example a new vital sign of waist circumference added by New World Health could be given the code and mnemonic 'NWH_WstCir'
- Make 'Name' and 'Display Name' the same
- Configure details
- Click 'Save'
Create Vital Signs
- TWAdmin > Dictionaries > Dictionary: Orderable Item
- Under Non-Medication and Immunizations, expand Clinical Findings Find and highlight Vitals
- Click 'Search' at the bottom of the screen to show/hide the search bar
- Search for the needed item before creating a new item. (use 'Name' 'Contains')
- Click Add. A new row will appear within the grid
- Enter 'Code', 'Name', 'Mnemonic' and 'Display Name'
- The Code is the database key and must be unique within the OID
- If the item is orderable, make the 'Code', 'Name', 'Mnemonic' and 'Display Name' the same as the Resultable item in the RID
- Always make 'Code' and 'Mnemonic' the same
- The code and mnemonic are limited to 10 characters and no spaces between characters
- Always use the organization mnemonic as the prefix. This will make it easy to tell which items were created for the organization. For example a new vital sign of waist circumference added by New World Health could be given the code and mnemonic 'NWH_WstCir'
- Make 'Name' and 'Display Name' the same
- Indicate if the vital signs Orderable Item is orderable by placing a checkmark in the box (please give example of each)
- Do not check the “Complex” Order Indicator
- Select appropriate setting from the Orderable Via drop down list:
- User Only – orderable in TouchWorks only (more explaination here?)
- Interface Only – orderable through Order Interface only (more explaination here?)
- User or Interface - orderable in TouchWorks and/or through Orders Interface
- Select appropriate orderable item mode (OID Mode):
- Draft
- Active
- No longer used
- The 'Order Type' will automatically default to Clinical Findings
- Click Save.
- IF the new item is orderable, continue with the following steps. (Are all vital signs orderable?)
- Click on the Results collapsible detail pane
- Click blue RID Selector link
- Search for the Resultable item to link to the orderable item (use 'Entry Name' 'Contains') If the matching Resultable Item does not exist, you may need to go to the resultable item dictionary, create a new Resultable Item, and then return here to link it)
- Click the binoculars to search. The results will display within the grid.
- Select the desired orderable item
- Click the down arrow
- Click 'OK'
Create Vital Signs Panels(Views)
- TWAdmin > Dictionaries > Dictionary: Orderable Item
- Under Non-Medication and Immunizations, expand Clinical Findings Find and highlight Vitals
- Click 'Search' at the bottom of the screen to show/hide the search bar
- Search for the needed Panel before creating a new Panel. (use 'Name' 'Contains')
- Click Add. A new row will appear within the grid
- Enter 'Code', 'Name', 'Mnemonic' and 'Display Name'
- The Code is the database key and must be unique within the OID
- If the Panel is orderable, make the 'Code', 'Name', 'Mnemonic' and 'Display Name' the same as the Resultable item in the RID
- Always make 'Code' and 'Mnemonic' the same
- The code and mnemonic are limited to 10 characters and no spaces between characters
- Always use the organization mnemonic as the prefix. This will make it easy to tell which Panels were created for the organization. For example if New World Health wants to create a Panel for Adult Male but still retain the Allscripts Adult Male Panel the code and mnemonic 'NWH_AdultM' could be used.
- Make 'Name' and 'Display Name' the same
- Indicate that the vital signs Panel is orderable by placing a checkmark in the box (All vital signs panels are orderable?)
- Check the “Complex” Order Indicator
- Select appropriate setting from the Orderable Via drop down list:
- User Only – orderable in TouchWorks only (more explaination here?)
- Interface Only – orderable through Order Interface only (more explaination here?)
- User or Interface - orderable in TouchWorks and/or through Orders Interface
- Select appropriate orderable item mode (OID Mode):
- Draft
- Active
- No longer used
- The 'Order Type' will automatically default to Clinical Findings
- Click Save.
- Once saved, a new detail pane will appear known as Child Orders (you may need to scroll down in the bottom/detail pane), where an administrator can define the orderable items to be included in the vitals panel.
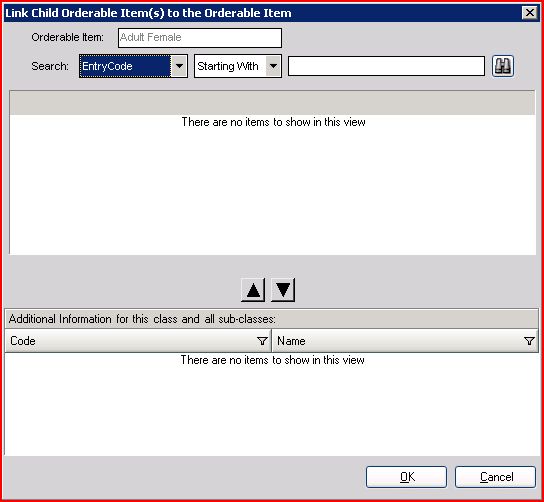
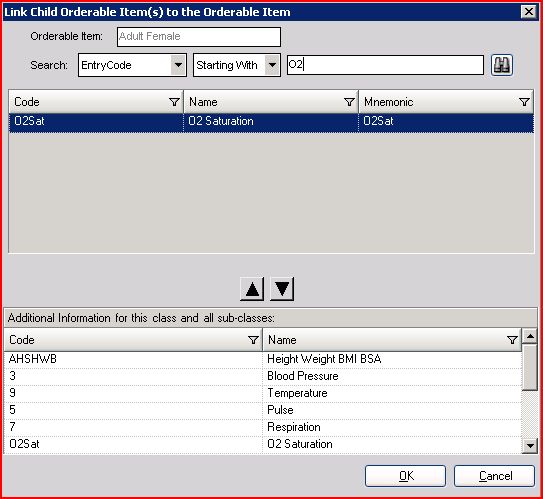
- Click OID Selector link. The Link Child Orders Item(s)… dialog box will display.
- Find an orderable item via entry name, code, or mnemonic.
- Click the binoculars to search. The results will display within the grid.
- Select the desired orderable item
- Click the down arrow
- Repeat steps add additional orderable items
- Once complete, click OK
Vital Signs Picklist
- A picklist is a subset of entries that an administrator could create to make vitals selection more efficient
- Organizations can create Vital Sign picklists that can be assigned to TouchWorks users
- The Vitals Picklist would control what a user would have access to within TouchWorks Version 11
- A Vitals picklist could include the custom vitals panels that are important for a given specialty or practice
Creating a Vital Signs Picklist
- Within TW Admin – TW Setup – Dictionaries – Orderable Item
- Click Picklist. The Orderable Item Picklist dialog box will display.
- Click Add Picklist
- Enter a Picklist Name
- Click OK
- Select the New Vitals Picklist in the left pane
- Click Add Entry. The Add Entries dialog box will display.
- Find the desired vital signs orderable item via name, code, or mnemonic
- Click the binoculars to search. The results will display within the Item Available pane on the left.
- Select the desired orderable item
- Click Add. The orderable item will be added to the Items Selected pane on the right.
- Repeat steps 8-11 to add additional entries.
- Once complete, click OK.
- File:Jdb 29.JPG
- Note: To add your newly created Orderable Item to global selection options (located next to heart on Clinical Toolbar), please also add your item to TW Vitals
- File:Jdb 30.JPG
Setting System Preferences
- Customers can associate a Vitals Picklist by setting a Results preference at the enterprise, organization, or user level
- In addition, they can set default vital signs views based on the age and gender of a patient
Special Cases:
- Located in Preferences (TW Admin) >> Results there are 4 default vitals that can be set given a patient's criteria. Please adjust as needed, using the EXACT TEXT match of your Vitals Picklist.
- Also located in Preferences (TW Admin) >> Results there is a Preference labeled Vitals Picklist this is the master control for the picklist locate next to the heart icon on the Clinical Toolbar.
Adding Custom Vitals Components
- Create new Resultable Item in TW Admin >> Dictionaries
- Create new Vitals Orderable Item in TW Admin >> Dictionaries (as described above). Specify this Vital as Orderable, but not Complex and Save.
- Upon Save, your new Orderable Item will be highlighted and you will be given the opportunity to add your Resultable Item (created in step 1) below by clicking on the RID Selector link and using the Search utility to find your Resultable, and move it to the bottom (using the arrows) and hit OK.
- Select Phys Admin Workplace and select Flowsheets >> Vitals.
- Click Add Item, and using the Search utility find the name of the New Vitals Orderable Item and using the arrows move the your Vital to the Selectable Orderable Items column (on the right) and click OK.
Making the Date and Time editable
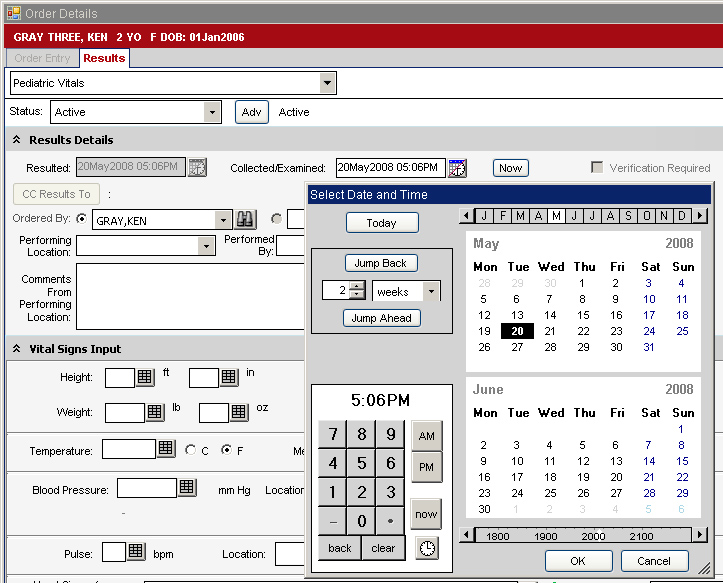
With certain workflows you may find it necessary to quickly jot down the vitals and return later to TouchWorks to enter that information. In order to change the date and or time to match when the vitals were taken, make the following changes to the desired vitals panel.
- Log into the TWAdmin workspace
- On the vertical toolbar, click Dictionaries
- Select Orderable Item from the Dictionary drop down list
- Under Non-Medication and Immunizations, expand Clinical Findings
- Find and highlight Vitals
- Select the desired Vitals panel to edit and on the details screen scroll down to Performing
By setting the Overdue Interval (I set mine to "10" following the example of a vitals panel provided by Allscripts) this allows the user to enter the correct date/time for when the vitals were taken.


