Patient Portal 2.0
Introduction
This wiki page reviews the setup and functionality of the MEDITECH Patient Portal 2.0. To meet Meaningful Use, HEDIS measures, ACO and PCMH accreditation requirements,healthcare organizations are required to implement a patient portal.
You can customize which features you want available to patients. You can also customize the color scheme. To start, your organization should ask what would keep patients logging back in and also what your organizational needs are to meet any accreditations or measures. At a minimum patients should have access to health records, medication lists and their profile to accommodate proxy access and update demographics.
This wiki will review all options with the portal and the setup screens that control them. Some of the menus and functionality described in this wiki will vary from system to system depending on which version of the application being used.
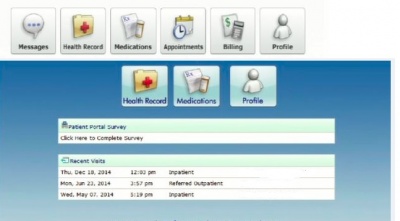
Top is a full functional portal, the bottom shows a minimal function portal with a changed color scheme.
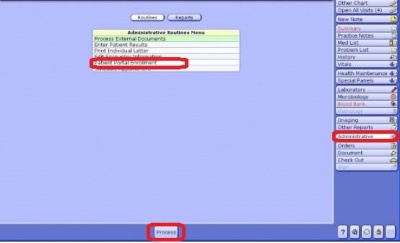
To enroll a patient in the portal, you can use the Patient Portal Enrollment Routine. This routine is found by access the EAR Administrative Panel. While in a patient's chart, you will access the Administrative Routines from the button on the lower right. By selecting this button you will be presented with a list of Routines that includes, Patient Portal Enrollment and click Process.
Messages
Setup
To setup this section of the patient portal there are a few areas you will need to address.
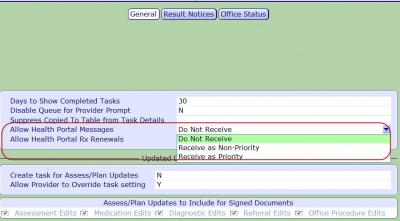
- To Allow Messages to/from the patient portal first set the Customer or EHR Parameters. Here the priority of those messages will be set also. The example below is using MPM 6.0 and navigating through Clinical Menu>PWM>Dictionaries>Customer Parameters.
As you can see this is also where you will turn on the ability to receive RX renewal/refills that will be discussed later.
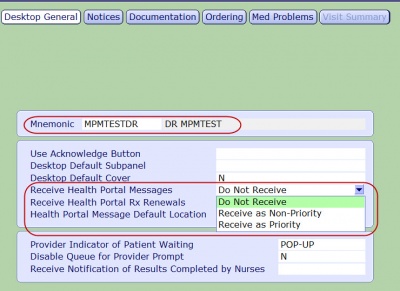
- Then access per user and security group will need to be set as well as the priority at the user level. The example below is an example of a user setup accomplished by navigating through Clinical Menu>PWM>Dictionaries>Preferences.
Workflow
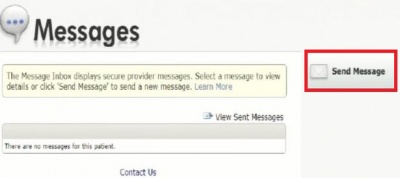
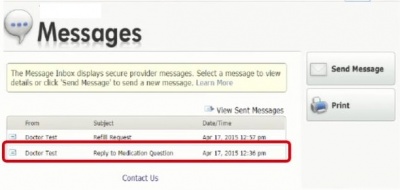
This functionality is very much like sending an email. The patient clicks on the Messages button within the portal. A list of the patient's message will appear if any. To send a new message the patient will click on the Send Message button.
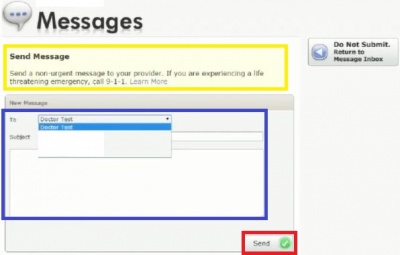
The patient will then be presented with a window that again looks like starting an email, with a To:, Subject:, and a text box. When clicking inside the To: field a drop down of available recipients is provided. The available recipients are set based on what providers the patient has associated with either through an appointment, services rendered or care team designation. Once the patient has completed composing the message they will click the send button in the bottom right hand corner. Please Note: The message in the yellow SEND MESSAGE box is an informational message that is highly recommended to utilize with your "in case of an emergency call 911" message. These are done in the content parameters upon setup.
The message is then sent to the provider (and designee's) desktop and is listed under messages.

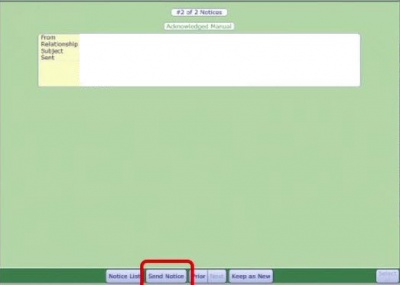
The provider will click on the message and will then be presented with a window just like receiving an email. The options at the bottom of the window are:
- List (which takes them back to the list of messages)
- Send Notice (sends a reply to the patient)
- Prior (takes you to the message prior in the list)
- Next (takes you to the next message in the list)
- Keep as new (leaves the icon next to the message that it is a new message)
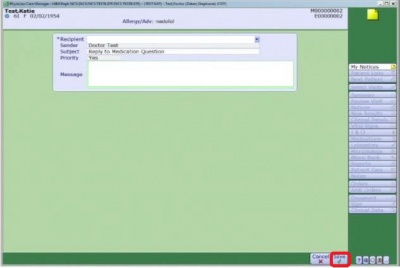
If you click send notice a window presents that is like responding to an email. The provider will type the response and click save and the response then goes back into the patient's message queue.
Health Record
One of the areas that patients tend to visit frequently is the Health Records section of the portal. Here they can view a health summary, recorded allergies and diagnosis, test results, medication list, reports and a history of their visits. For this wiki we are going to focus on the reports functionality.
Setup
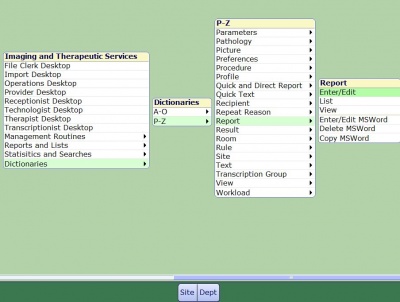
To set up this section of the portal you will need to setup a report for each area the will generate a report and be published to the portal. As an example we will use the Radiology reports. To access the dictionary for this you will navigate from the Clinical Menu>RAD Database>Which ever department you are creating the report for>Dictionaries>P-Z>Report. From the below screen shot you will see that once you get to the Imaging and Therapeutic Services Dictionaries selection you are presented with two buttons Site/Department at the bottom of the page. This allows you to define settings per site or departments in the case of multiple radiology departments or sites.
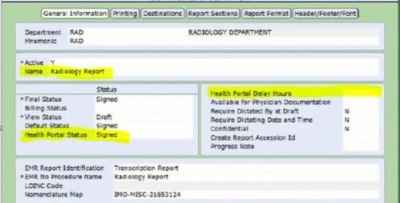
You can either chose Enter/Edit to edit start the document or Enter/Edit MSWord to set up the parameters and margins for the report. When in the Report Enter/Edit menu there are two fields that allows the functionality of publishing the reports to the portal. Those fields are Health Portal Status and Health Portal Delay Hours. The Status allows you to chose which status the document needs to be in before it is available for publishing. In the example below it is showing the signed status. The Delay Hours allows you to set how many hours after the document is signed for it to be published. This is a very handy setting for Providers that like to have time to speak to a patient about an abnormal report before publishing. Therefore consideration of system wide settings is to be taken when dealing with specialties such as Oncology, Neurology, Psychiatry, etc.
Workflow
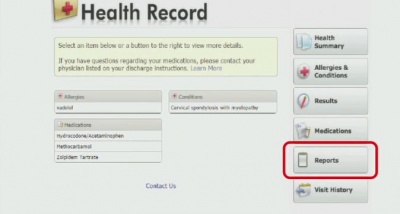
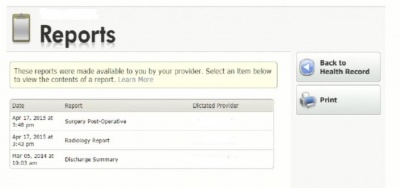
To access the reports option on the portal the patient will click on the Health Record button from the main portal screen. (as shown above) They will then select the reports button from the Health Records View. They will be presented with a screen that lists all reports that have been published for them.
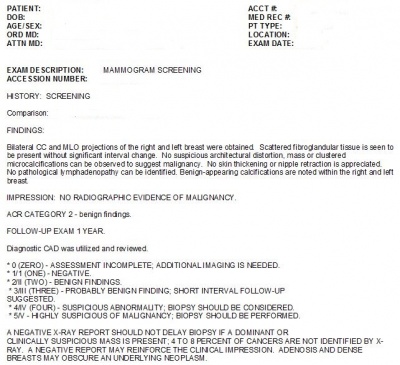
They will simply click print. The report will print to the patient default printer. Below is an example of a radiology report. This is the same view the Providers will see within the medical record. When setting up your reports, keep in mind if you will be wanting these published and how they will look. Test results and radiology reports might look more like this but a clinical visit report will be broken out into sections like the chart view progress note.
Medications
In the Health Records section of the portal you had an option to review medications and print a medication list. The actual Medications button here also allows for refill requests to be created.
Setup
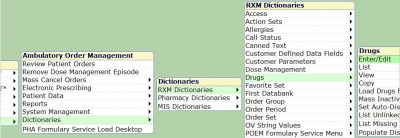
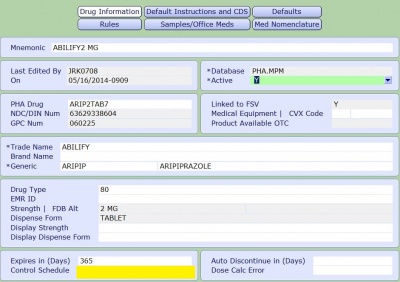
The setup for this functionality to allow renewal requests from the portal is within the same setup area as the messages setup. Please refer to that section for instructions. The rest of the setup is maintained in the actual RXM Dictionaries. One way to navigate to this dictionary is by accessing the Clinical Menu>RXM-Prescription Order Management Database>Dictionaries>RXM Dictionaries. Under the Drug Information section of the drug selected there is an area for control schedule. Depending on the schedule in this field the drug will be eligible for refill through the portal. You can also create rules for prescriptions under the rules button.
Workflow
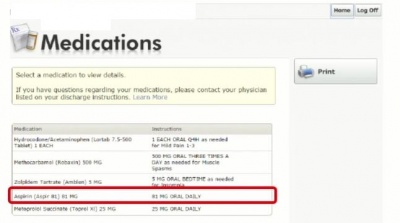
The patient will select the Medication button in the portal. They will then be given a screen that shows a list of current medications. You can also create a message to display at the top of the page in the content parameters of the patient portal setup. From this screen the patient can print a list of medications by selection the print button to the right. If they are wanting more information about a particular medication or request a refill they will simply select that medication.
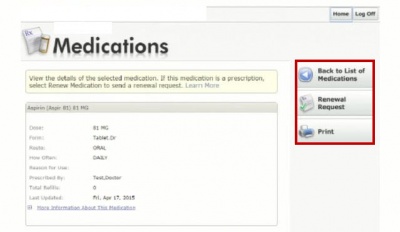
They will be given a screen that shows the details of the medications including if how it is supposed to be taken and a link to get more information about the med. On the right there are options to return to the list, request a renewal or print the details of this prescription.
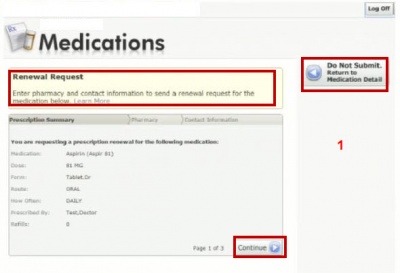
- When the button for Request Renewal is chosen the patient will be given a Prescription Summary screen. After reviewing this information the patient can either select the button on the right for Do Not Submit and return to list or at the bottom right of the screen to continue. (screen 1)
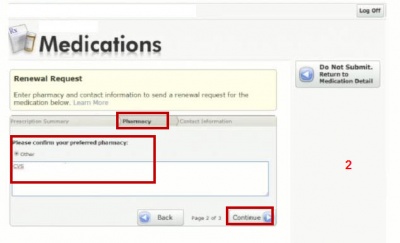
- The next screen allows them to enter the pharmacy information if one does not already exist or add a secondary pharmacy for this refill. They again have the choice to Do Not Submit or Continue but they now also have a Back option to return to the summary screen. (screen 2)
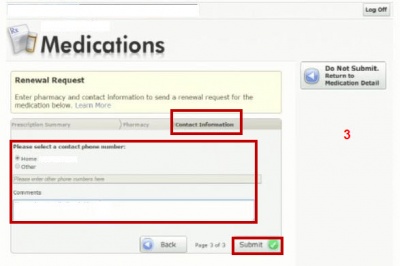
- By choosing continue, they are then given the screen to enter contact information. This will automatically pull any phone numbers from the patients registration file however if there is a special contact number for this instance they can enter that here. Again they have the option to Do Not Submit and return to list as well as the back button to return them to the Pharmacy Information screen. The other option is for Submit. Many patients are confused that this is just a REQUEST for refill not actually sending the refill to the pharmacy. The provider or designee will still have to approve of the refill before it is sent to the pharmacy. (screen 3)
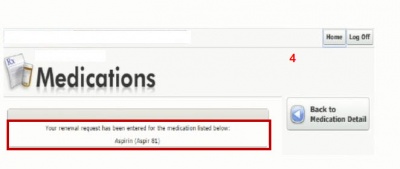
- Once they click submit they are given a confirmation that the REQUEST for renewal has been entered. They can go back to the medication detail and enter another request, go to the Home screen of the portal or log off. (screen 4)
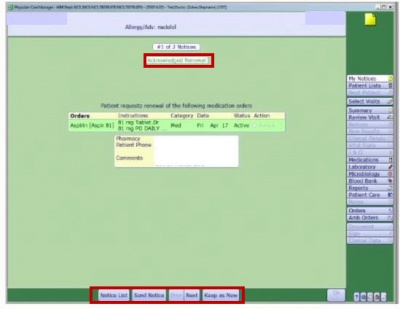
The next steps of the workflow are the responsibility of the provider or designee. A request for the refill will be send to the providers desktop or notices list. The provider will select the request from the list and a screen will be presented that lists the information about the request. They will have several buttons at the bottom of the screen.
- Notice List - this will take them back to desktop
- Send Notice - this will send a message back to the portal
- Prior - will take you the previous message/notice in the list
- Next - will take you to the next message/notice in the list
- Keep as new - this will take you back to the list but keep the message new.
There is also a button at the top center of the screen called Acknowledge Renewal. If you have renewals set up in your portal to electronically send to the pharmacy and the prescription is not a controlled substance this button would be active. By selecting this button the renewal will be documented in the chart and a renewal is sent to the pharmacy. Otherwise the manual process for refilling prescriptions will need to be followed.
Appointments
Setup
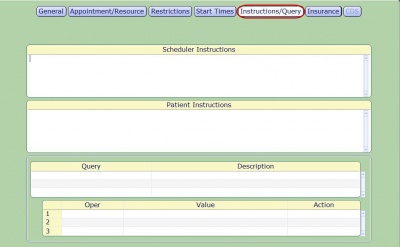
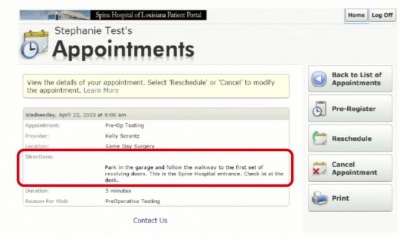
This is activated in the content parameters. Information pulls from settings in the Appointment Management, CWS and ORM dictionaries. A few options you have is to allow scheduling of new patients, specific appointment types and allowing the patients to update registration or pre-register. When in the appointment type dictionary, there is a button for health portal which has the settings to turn on the appointment type for portal scheduling, waitlist priority, if the patient is allowed to cancel via portal, and default time frame to allow patient to cancel. There is also a button for Intructions/Query for that appointment type. Instructions created here for Patient Instructions will be present to the Appointment Detail screen for the scheduled appointment within the portal.
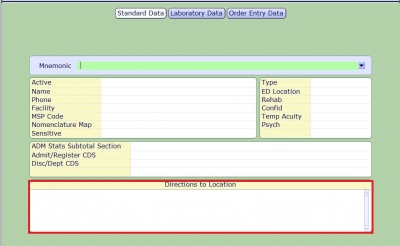
To add directions (such as directions to a location) is done in the MIS - Locations dictionary.
Workflow
When clicking on the Appointments Icon within the portal, a patient will be presented with a list of upcoming appointments and a box to "Request a New Appointment". If "Request a New Appointment" is selected creates a task to the scheduler desktop for the requested appointment time and provider, also adds this request to the Waitlist. The schedule will work the task and a response is sent back to the patient or the patient is called with a confirmation.
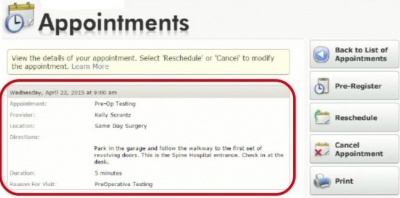
By clicking on one of the appointments in the list a screen is launched with details of the appointment. On the right will be a list of options:
- Back to List of Appointments
- Pre-Register (if enabled)
- Reschedule (if enabled) Will also send a request/task to scheduler desktop
- Cancel Appointment (if enabled) Removes directly from schedule
(Enabling the above options is done in Appointment Management)
Billing
Workflow
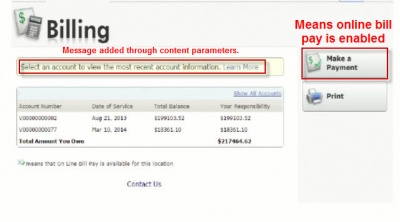
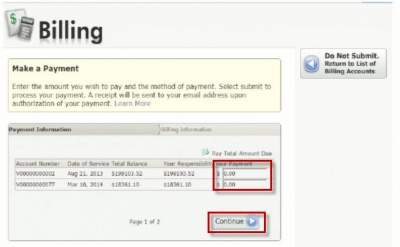
When the patient clicks on the Billing icon in the portal they will be taken to the following screen. In the content parameter setup a message has been placed here. You can also place a message such as "to pay your bill go to www.paybills.com" to direct patients to a third party site to pay their bill. A list of the accounts with balances will be listed below. To make a payment, the patient will click the "Make a Payment" icon on the right. This icon will only be active if online bill pay has been activated. The ability to print a copy of a bill is also available.
Once the "Make a Payment" option is select, the next screen will allow for an amount to be entered that the patient wished to be applied to the balance per account number. Next the patient will click the Continue button in the bottom right hand corner of the page. If they made a mistake and want to return to the main window they would click the "Do Not Submit" button on the top right hand side of the screen. The next screen presented to the patient will be the screen to enter credit card information.
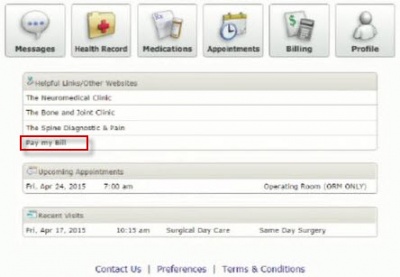
Another option for your organization would be to put a hyperlink on the main page to a third party vendor that processes payment.
Profile
This is a topic that brings a lot of controversy. The are many variables that need to be considered when writing proxy access policy.
- HIPAA regulations
- State regulations on adolescent proxies
- Are you going to require a wet signature from the patient to approve a proxy?
- Who are you going to allow it for?
Workflow
First step to the portal is the patient enrollment. So how do patients to enroll? There are two ways.
- Self Enrollment Website
- Manage Users Routine
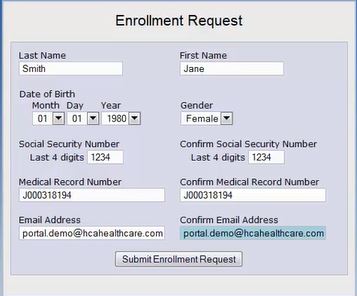
Below is the sample of the Self Enrollment website. The patient will complete the information and click the submit enrollment request. The newest version allows the patient to enroll with the Social Security Number instead of MRN. They will get an email to confirm and will then follow the instructions to complete the enrollment.
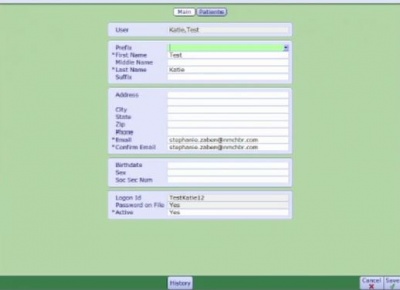
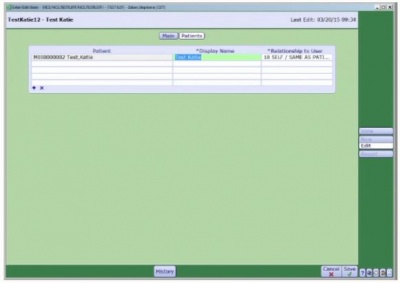
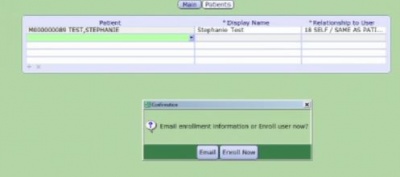
If enrolling the patient via Manage Users Routine, staff will navigate to manage users. Under the Main button, the information entered will be for the patient requesting access. On the second button, Patients, the Patient's information will be entered on the first line along with what they wish for the display name, and relationship to user. In this instance will be self. On the next line you will enter who is wanting proxy access, their display name and relationship. In the 2.0 version, once all the information is entered and saved you will get a pop up with two options - Email or Enroll Now.
- email will send the user a link just as the self enrollment website does and the user will follow the instructions to complete enrollment.
- enroll now will launch the website and the user can be enrolled immediately.
On the right you have the options to View (one time to view the username and password on the screen), the username and password can also be printed which staff can hand to the patient while they are there in the office. Other options are New, Edit and run a report.
If the patient wants to see who has proxy access to their account, once logged into the portal they will click on the Profile button. By scrolling to the bottom and clicking on the Access link, they will see what users have been given access to their portal information.
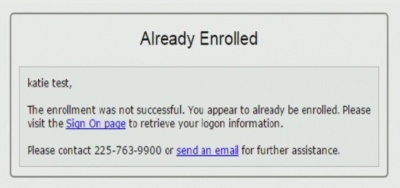
Gotchas - If the patient's name (including suffixes) or email address do not match what is in MEDITECH the enrollment will error. If the patient is already enrolled and tries to reenroll they will get the following message.
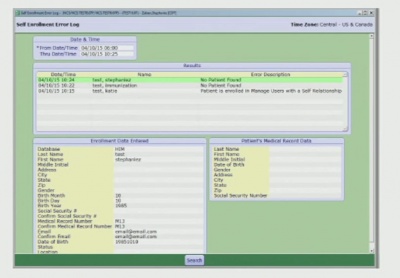
There is also an error log that can be viewed routinely. A suggestion would be that someone monitors this error log and is proactive in assisting users with issues. Not only will patients appreciate the assistance but it will also help the enrollments coming instead of the patient just giving up.
